cloudintheking

时光醉清风,总有人会记得


  • 首页

  • paint

  • works

  • 标签15

  • 分类6

  • 归档24

powershell之启动远程jar服务

发表于 2022-01-05 | 评论数:
本文字数: 2.6k | 阅读时长 ≈ 2 分钟

-


-

个人笔记,如有描述不当,欢迎留言指出~

起因

主管抽风说每次都要登录远程服务器再启动jar太麻烦了,要是有个一键启动远程jar的批处理就是。于是这个任务就交给我了…

powershell配置

用管理员权限启动 PowerShell,执行下面的命令:

1
2
3
4
5
6
7
8
9
10
11
12
13
14
15
16
17
18
#客户端或服务器公共配置:
Get-Service WinRM #查看WinRM服务的状态
Enable-PSRemoting –Force #配置系统接受远程命令
Set-Service WinRM -StartMode Automatic #开启WinRM服务自启动
winrm set winrm/config/winrs '@{MaxMemoryPerShellMB="3000"}' #设置powershell最大内存 方法一推荐
Set-Item WSMan:\localhost\Plugin\Microsoft.PowerShell\Quotas\MaxMemoryPerShellMB 3000 #设置最大内存 方法二
Restart-Service winrm //重启winrm服务使配置生效


#服务器配置:
Set-Item WSMan:localhost\client\trustedhosts -value "192.168.1.44,192.168.1.45" #设置设置主机可信任的客户端地址
winrm set winrm/config/client @{TrustedHosts="192.168.1.45,192.168.1.44"} #设置设置主机可信任的客户端地址,当上个命令无效时,可选用该命令(该命令请在cmd中使用)
Get-Item WSMan:\localhost\Client\TrustedHosts #查看可信任主机
get-executionpolicy #查看脚本执行策略
set-executionpolicy remotesigned #设置执行策略为远程可执行
Restart-Service winrm #重启服务生效

Test-WsMan xxx.xxx.xxx.xxx #客户端测试远程连接

jar包上传处理命令

服务器上必须安装了ftp,否则没法上传文件。我公司服务器系统是windows server 2008,用它自带的IIS创建ftp,并设置虚拟目录。

新建上传文件脚本up.bat:

1
2
3
4
5
6
7
8
9
10
11
12
13
14
15
16
17
18
curl -X POST 192.168.1.44:8886/shutdown #关闭44服务器上8886端口服务
curl -X POST 192.168.1.44:8887/shutdown#关闭44服务器上8887端口服务
curl -X POST 192.168.1.44:8888/shutdown#关闭44服务器上8888端口服务

Echo open 192.168.1.44 >ftp.up #打开连接44服务器ftp连接
Echo Administrator>>ftp.up #服务器上登录用户名
Echo 59@SDS25>>ftp.up #登录密码
Echo cd .\project1>>ftp.up #因为进入的是ftp的根目录,所以使用.\project1,进入根目录下的project1
Echo binary>>ftp.up #二进制数据传输格式
Echo put "E:\Workspace\idea\jcnyJava\target\jcny-java-0.0.1-SNAPSHOT.jar">>ftp.up #传送本地文件到ftp中
Echo cd ..\project2>>ftp.up #使用..\project2,进入根目录下的project2目录
Echo put "E:\Workspace\idea\jcnyJava\target\jcny-java-0.0.1-SNAPSHOT.jar.original">>ftp.up #传送本地文件到ftp中
Echo cd ..\project3>>ftp.up #进入根目录下的project3目录
Echo put "E:\Workspace\idea\jcnyJava\target\jcny-java-0.0.1-SNAPSHOT.jar.original">>ftp.up #传送本地文件到ftp中
Echo bye>>ftp.up #客户端关闭ftp连接
FTP -s:ftp.up #服务器关闭ftp连接
del ftp.up /q #删除ftp连接
Pause

powershell启动远程服务命令

新建一个启动脚本deploy.ps1

1
2
3
4
5
6
7
8
$na = "yourname"  #服务器用户名

$p2 = ConvertTo-SecureString "yourpassword" -AsPlainText -Force #加密登录密码
$A = New-Object System.Management.Automation.PSCredential($na,$p2) #创建连接
Invoke-Command -ComputerName 192.168.1.44 -Credential $A -ScriptBlock { #执行远程操作
Set-Location E:\webroot\projects #进入远程服务器目录
invoke-expression -command E:\webroot\tongtu-projects\startall.bat #远程服务启动的脚本路径
}

以上命令都是针对Windows系统的,Linux系统应该是写bash脚本吧。
如果下次主管说要一键启动远程Linux上的服务的话,到时候我再写篇linux的吧。

mongodb操作之$slice

发表于 2022-01-05 | 评论数:
本文字数: 2.8k | 阅读时长 ≈ 3 分钟

-


-

个人笔记,如有描述不当,欢迎留言指出~

翻译原文:https://docs.mongodb.com/manual/reference/operator/update/slice/#examples

$slice(切分)

当进行$push(插入)操作时,可以通过 $slice修饰词来限制插入的数组元素个数。如果想从一个只读操作中映射或是返回数组元素中特定的值,详见$slice映射操作。
$slice修饰词必须搭配$each修饰词才能使用。不过,你也可以传递一个空数组给$each修饰词,从而只让$slice修饰词起作用。

1
2
3
4
5
6
7
8
{
$push: {
<field>: {
$each: [ <value1>, <value2>, ... ],
$slice: <num>
}
}
}

< num > 的值可以是:

Value Description
0 更新数组<field>为空数组
负数 更新数组<field>只包含最后<num>个元素
正数 更新数组<field>只包含开头<num>个元素,适用于2.6以上版本

Behavior(行为)

这些修饰词出现的顺序是无关紧要的。不过在上一个版本中,要求$each修饰词得作为第一个修饰词出现,如果要和$slice修饰词连用的话。这里有一份关于和$push搭配使用的修饰词列表,详见Modifiers。
不结合$each修饰词而只使用$slice修饰词将会导致出错,不信可以试试。

栗子

从数组末尾切片

一个学生集合包含以下文档:

1
{ "_id" : 1, "scores" : [ 40, 50, 60 ] }

下面的操作增加一个新元素到scores数组中,然后使用$slice将数组修剪为最后五个元素。

1
2
3
4
5
6
7
8
9
10
11
db.students.update(
{ _id: 1 },
{
$push: {
scores: {
$each: [ 80, 78, 86 ],
$slice: -5
}
}
}
)

操作的结果就是将更新后的scores数组切分为最后5个元素

1
{ "_id" : 1, "scores" : [  50,  60,  80,  78,  86 ] }

从数组头部切片

一个学生集合包含以下文档:

1
{ "_id" : 2, "scores" : [ 89, 90 ] }

下面的操作增加一个新元素到scores数组中,然后使用$slice修饰词修剪为前三个元素。

1
2
3
4
5
6
7
8
9
10
11
db.students.update(
{ _id: 2 },
{
$push: {
scores: {
$each: [ 100, 20 ],
$slice: 3
}
}
}
)

操作的结果就是将更新后的scores数组切分为前三个元素中。

只用slice来更新数组

一个学生集合包含以下文档:

1
{ "_id" : 3, "scores" : [  89,  70,  100,  20 ] }

为了只用$slice修饰词来更新scores字段,我们得给出要切分的元素数量(比如 -3)赋给slice修饰词,而且赋一个空数组给$each修饰词,就像下面的代码:

1
2
3
4
5
6
7
8
9
10
11
db.students.update(
{ _id: 3 },
{
$push: {
scores: {
$each: [ ],
$slice: -3
}
}
}
)

操作的结果就是将scores数组切分为最后三个元素。

slice 和push搭配使用

一个学生集合包含以下文档:

1
2
3
4
5
6
7
8
9
{
"_id" : 5,
"quizzes" : [
{ "wk": 1, "score" : 10 },
{ "wk": 2, "score" : 8 },
{ "wk": 3, "score" : 5 },
{ "wk": 4, "score" : 6 }
]
}

下面的$push操作将会:

  • 使用$each修饰词来增加多个文档到quizzes数组中,
  • 使用$sort修饰词,按照score字段来降序排序修改过的quizzies数组中的全部元素,
  • 使用$slice修饰词,只保留quizzes数排中前三个排序过的元素。
1
2
3
4
5
6
7
8
9
10
11
12
db.students.update(
{ _id: 5 },
{
$push: {
quizzes: {
$each: [ { wk: 5, score: 8 }, { wk: 6, score: 7 }, { wk: 7, score: 6 } ],
$sort: { score: -1 },
$slice: 3
}
}
}
)

操作结果就是只保留了quizzes数组中分数最高的三个元素。

1
2
3
4
5
6
7
8
{
"_id" : 5,
"quizzes" : [
{ "wk" : 1, "score" : 10 },
{ "wk" : 2, "score" : 8 },
{ "wk" : 5, "score" : 8 }
]
}

上面操作中的修饰词都会被Mongodb自行处理,所有它们之间的书写顺序无关紧要。更多详情请见Modifiers。

jhipster学习记录之jdl

发表于 2022-01-05 | 评论数:
本文字数: 1.5k | 阅读时长 ≈ 1 分钟

-


-

个人笔记,如有描述不当,欢迎留言指出~

jhipster学习记录之jdl

环境

  • os:windows10
  • java:1.8.0_161
  • node:10.16.0
  • npm:6.9.0
  • jhipster:6.1.0

jhipster

学习jhipster最好的方式,当然是去看官网啦,而且英语不好的小伙伴可以去官方维护的中文站点👉here

官网的入门指南里告诉我们,在命令行中敲下入hipster,随后就是一系列的选择配置,最终等待jhipster生成代码。
Alt text

但有没有觉得这样很low阿,它有这几个缺点:

  • 每次新建项目,都有进行大量的配置选择,效率低
  • 每次都只能生成一个项目,对于微服务项目,服务模块都要输入jhipster生成,效率低

所以我耐着性子继续往下看,当看到jdl的时候,发现上面两个缺点就不存在了


jdl(jhipster doman language)

jhipster领域驱动语言,详见👉here
只要编写一次jdl文件,就可以到处运行,再也没有烦人的配置选择了🙄

1
jhipster import-jdl "your jdl file"

它的语法其实挺简单,而且5.0以后支持注解,在定义的entity上直接使用@service、@dto、@paginate来代替service、dto、paginate

下面简单介绍一下jhipster生成代码流程:
当在command中敲入jhipster,在一系列配置选择完后,jhipster会在根目录下生成.yo-rc.json文件和 .jhipster目录。

  • .yo-rc.json里存放应用的配置,对应jdl的application.config
  • .*jhipster目录下存放应用的实体类配置,对应jdl中application.entites 、entity

jhipster再根据这些文件去生成项目代码。如果你需要重建一个相同配置jhipster项目的话,直接拷贝.yo-rc.json文件和 .jhipster目录放到新建文件夹下,进入command,敲下jhipster,就会生成一个相同配置的项目

另外,jhipster一开始是支持前端框架angular的,后来慢慢加入了react和vue。
但vue却并不在默认的选择配置中,如果你用过jhipster命令就会知道,在进行clentframework选项时,只会出现angular和react。如果前端如果要使用vue的话,就只能用jhipster提供的blueprint(蓝图)功能

1
2
npm install -g generator-jhipster-vuejs
jhipster --blueprint vuejs

这样就可以生成一个前端框架是vue的项目。
那么如何在jdl里应用呢?
这里吐槽一下,官网里jdl的语法介绍的并不全,找了半天也没看到blueprint的语法!
后来断点调试jhipster-core中,发现your node_modules folder\node_modules\generator-jhipster\node_modules\jhipster-core\lib\core\jhipster\application_options.js这个文件里存放了应用的所有配置参数
Alt text

在你的j’d’l文件里加入下面的代码就可以啦

1
2
3
4
5
6
7
application {
config{
...
blueprint vuejs
...
}
}

此处奉上我练习写的jdl文件👉demo👈

windows下编译mysql5.7.25

发表于 2022-01-05 | 评论数:
本文字数: 1.5k | 阅读时长 ≈ 1 分钟

-


-

个人笔记,如有描述不当,欢迎留言指出~

环境

  • windows10
  • cmake3.14.4
  • perl
  • bison2.4.1
  • boost1.59.0
    PS: 注意安装bison时,不要选择创建菜单、快捷键,否则在编译mysql时跟我一样掉进坑里,后面会说明

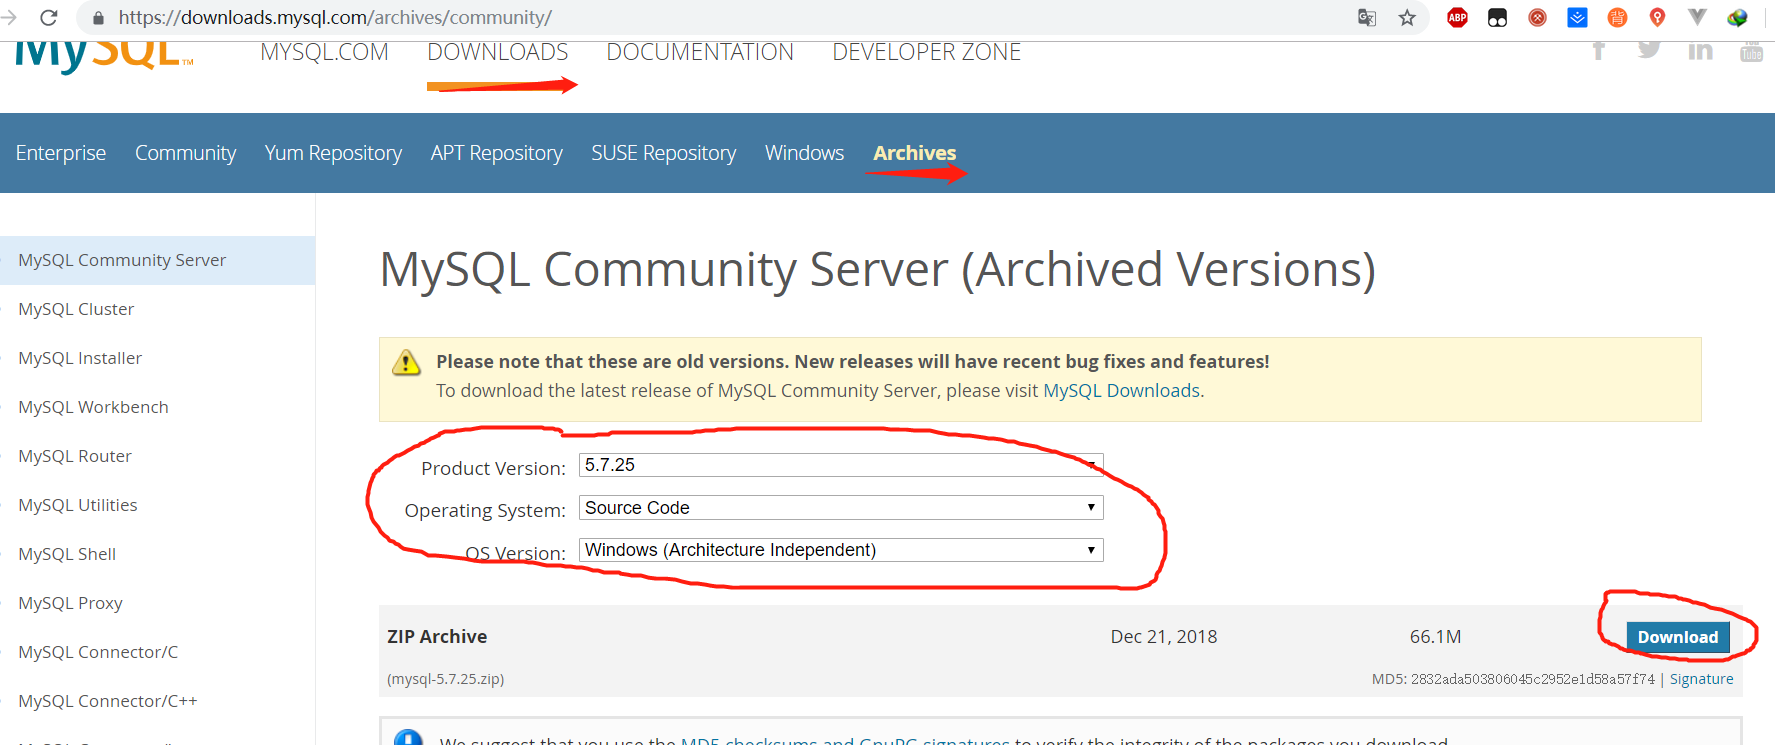
    下载源码

    mysql官网
    Alt text
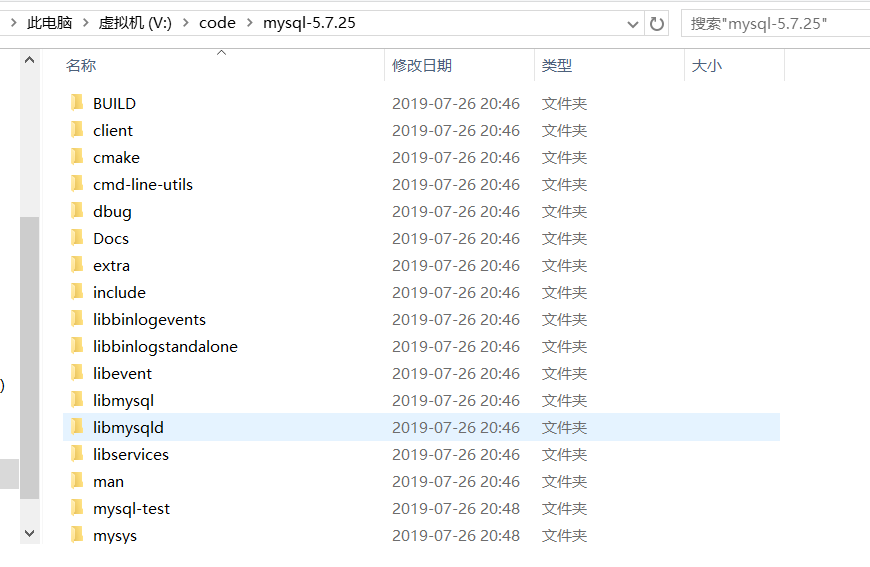
    解压后目录:
    Alt text

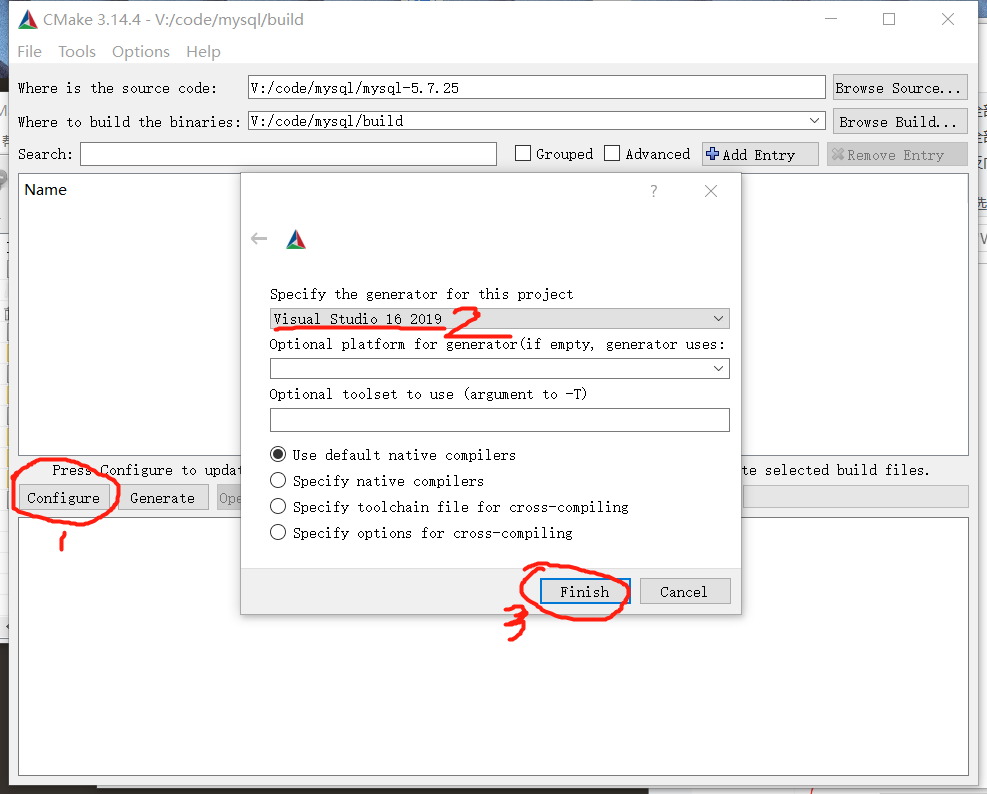
使用cmake生成vs解决方案

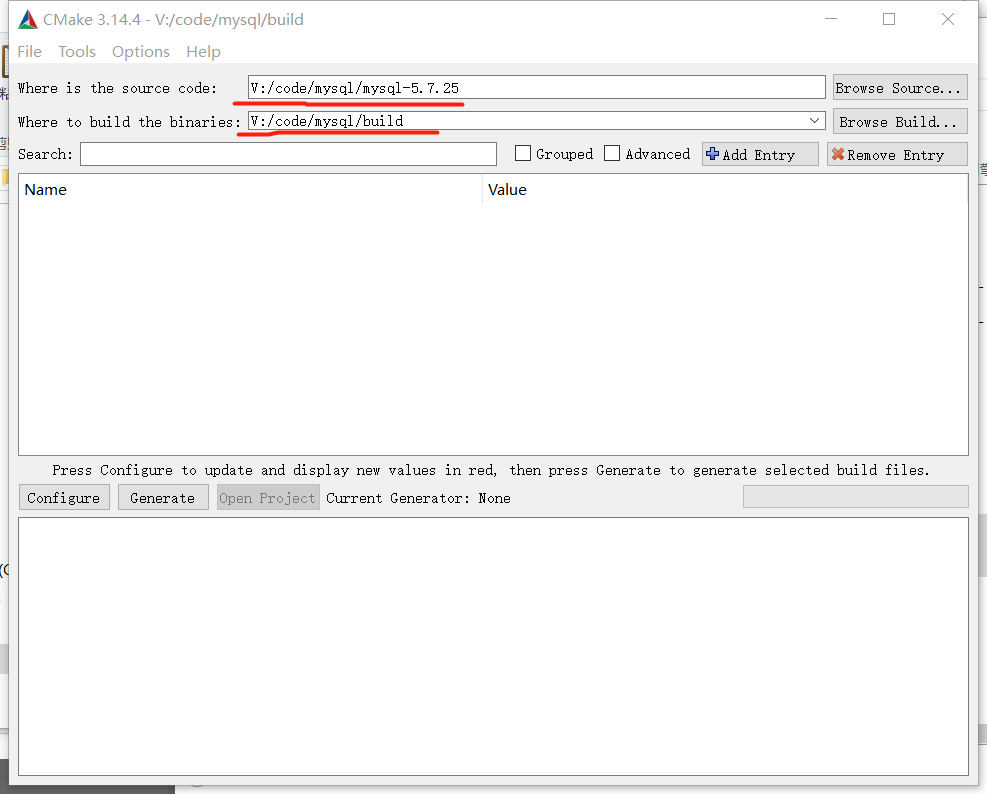
打开cmake-gui.exe
Alt text
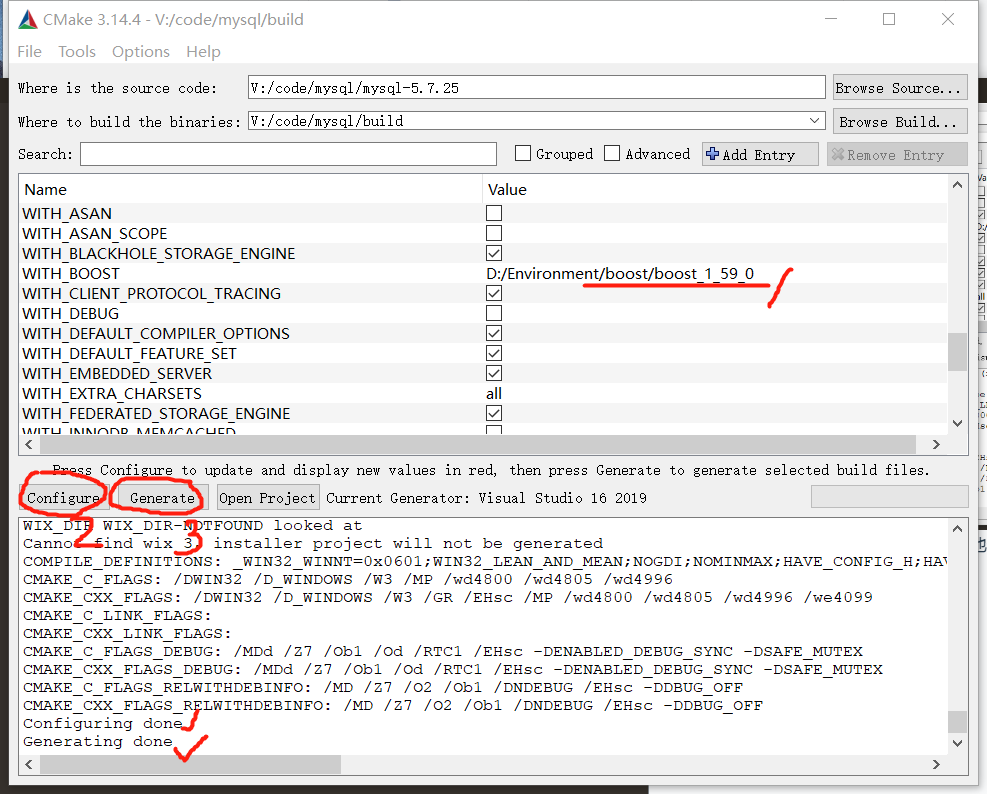
填好目录后
Alt text
正常情况下会报下面的错误
Alt text
cmake检测不到boost的位置

找到WITH_BOOST参数,输入本地安装的boost目录,再次点击configure,等待配置完成,最后点击generate,等待初始化完成。
Alt text
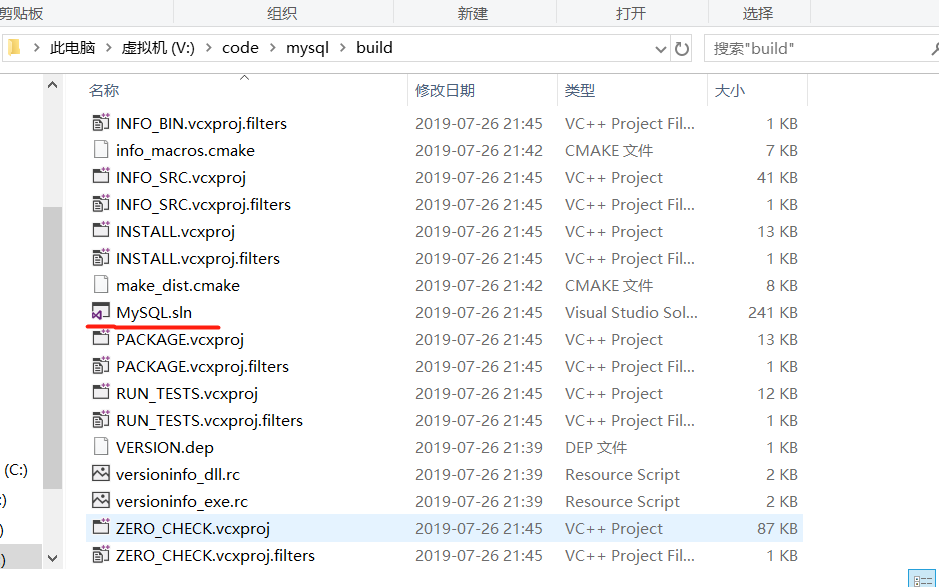
打开开始build目录可以看到,cmake给我们生成了MySQL.sln解决方案
Alt text

vs2019编译mysql

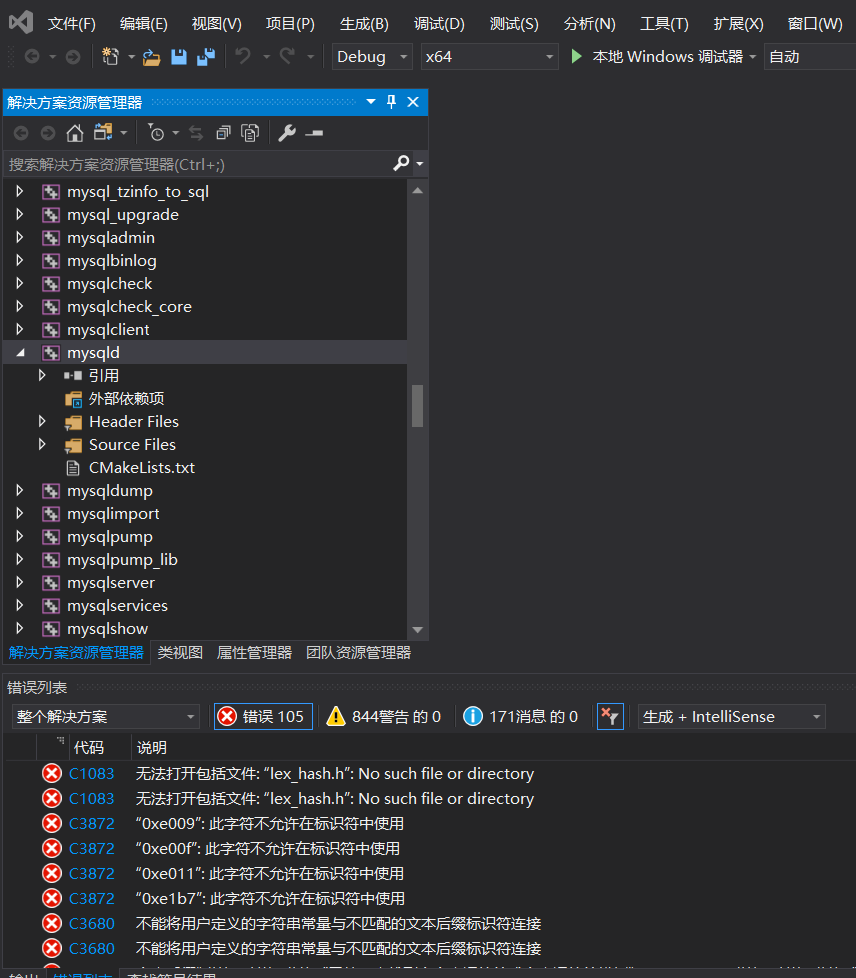
vs2019打开MySQL.sln后,可以看到一共生成了128个方案,全部编译非常耗时,所以我先只编译mysqld
Alt text

如果你是跟着我的步骤一步步做下来,那你会得到下面的错误
Alt text

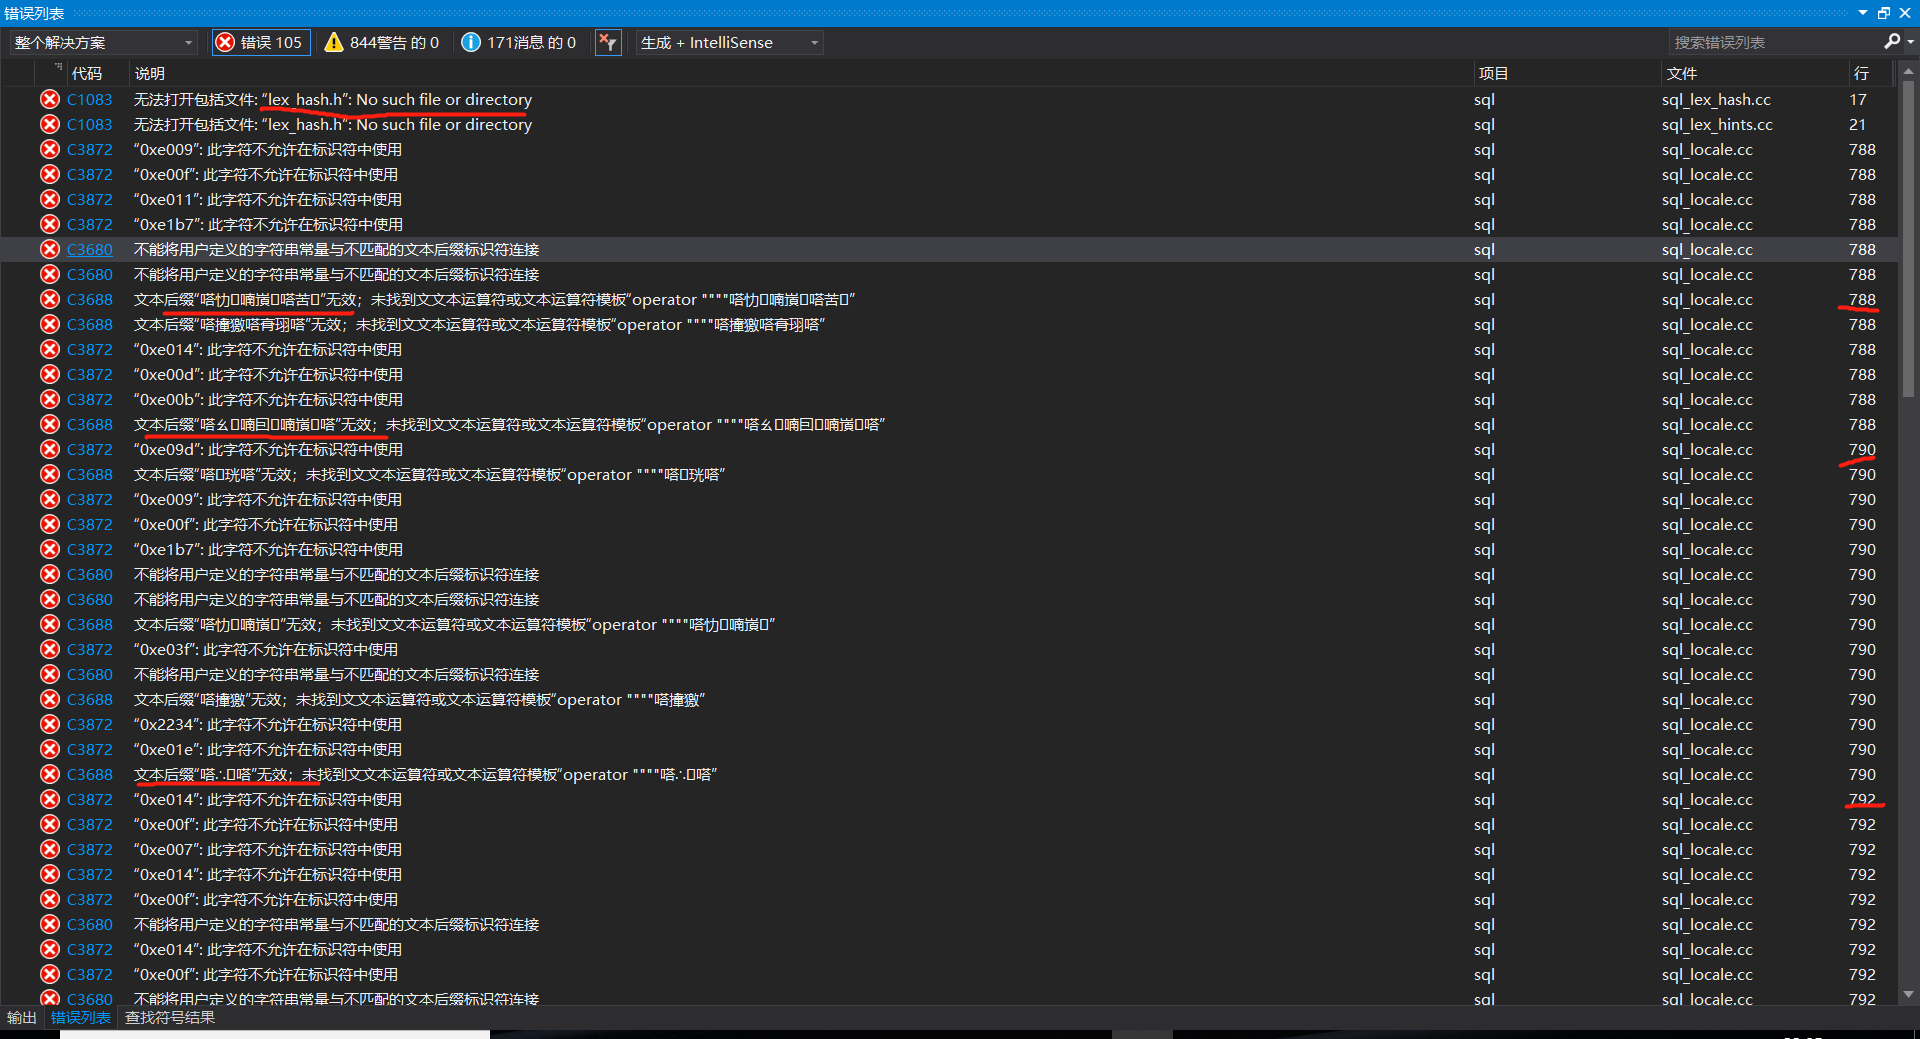
一共105个错误,总结一下就两种错误

  • 没有lex_hash.h文件
  • sql_locale.cc文件格式有问题,有乱码

先解决第二种,根据提示进入报错文件
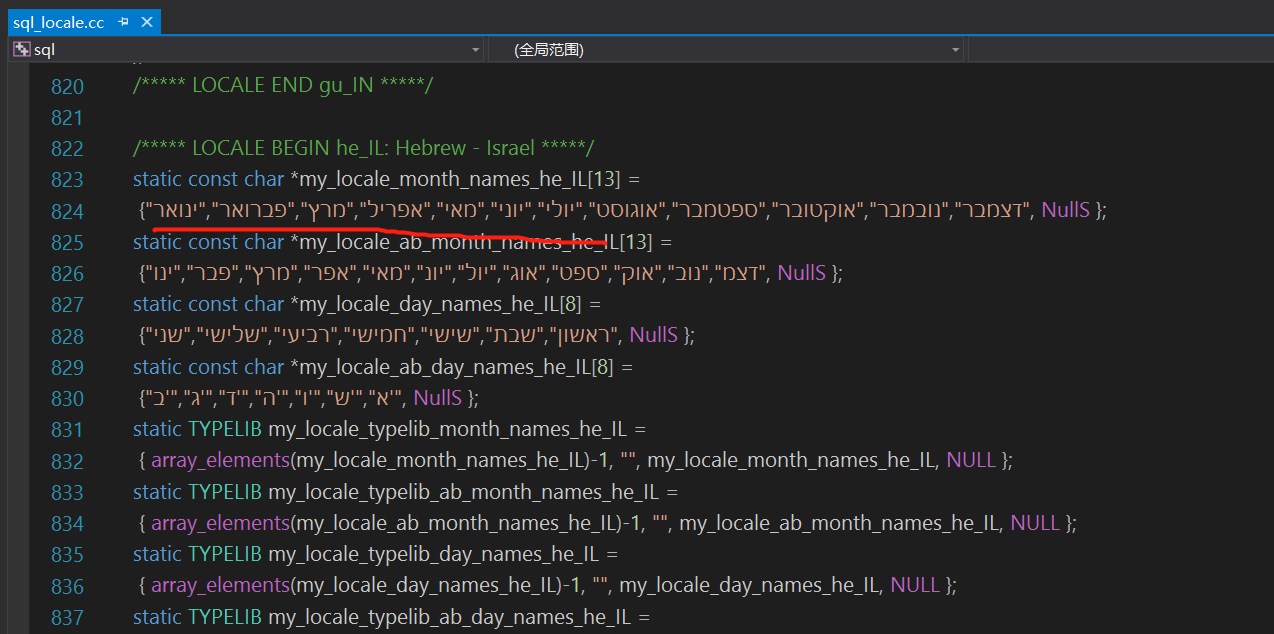
打开sql_locale.cc,好多乱码
Alt text
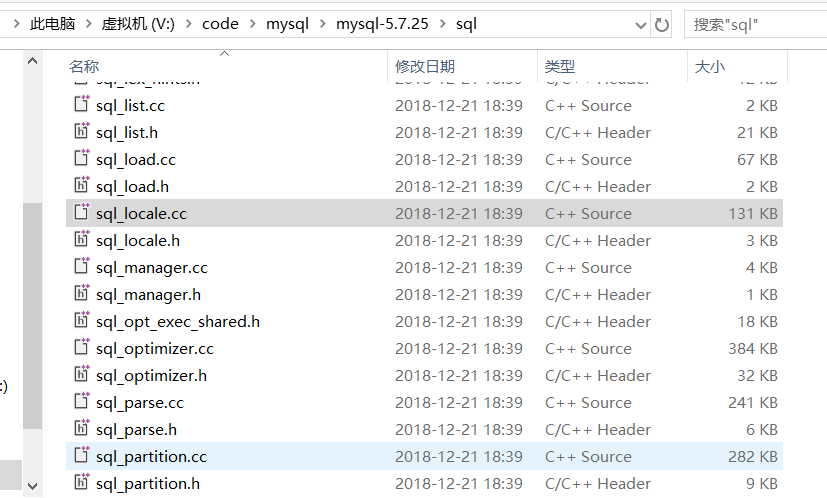
找到文件位置,重新保存为utf-8格式
Alt text

第一种问题,我之前没搞懂出错原因,就用笨办法手动生成缺失文件,这里就不说了这种解决思路了,太笨
后来偶然在网上发现一篇文章
经过一番摸索,我才发现,虽然bison安装的路径里没有空格没有中文,可是bison加入了开始菜单,导致bison找不到m4.exe,进而无法生成lex_hash.h文件
我也懒得重装bison,直接把m4.exe复制到编译后的sql目录下,然后重新编译下
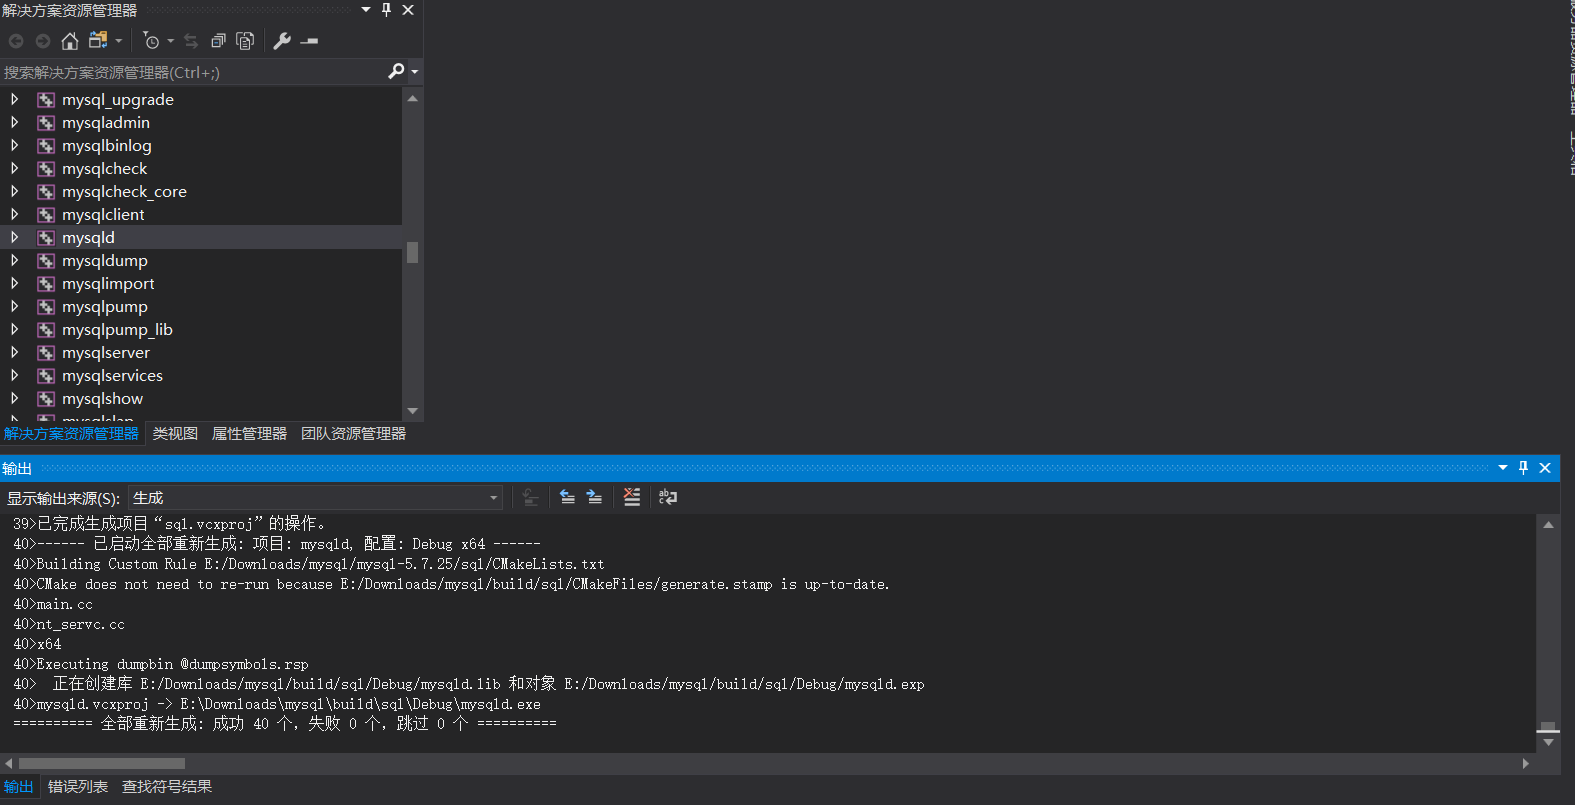
Alt text

调试mysqld

初始化数据文件

随便创建data目录,比如E:\Downloads\mysql\data
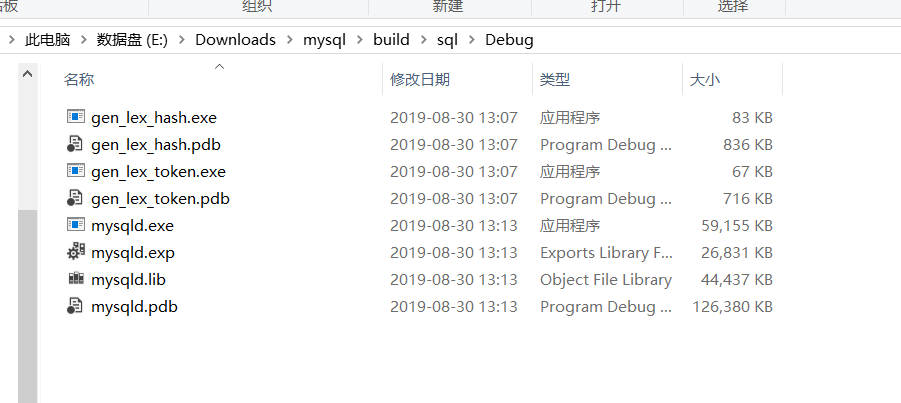
然后找到编译后的mysqld.exe文件,我这里是
Alt text
进入cmd模式输入初始文件命令

1
E:\Downloads\mysql\build\sql\Debug>mysqld.exe --initialize-insecure --datadir=E:\Downloads\mysql\data

Alt text
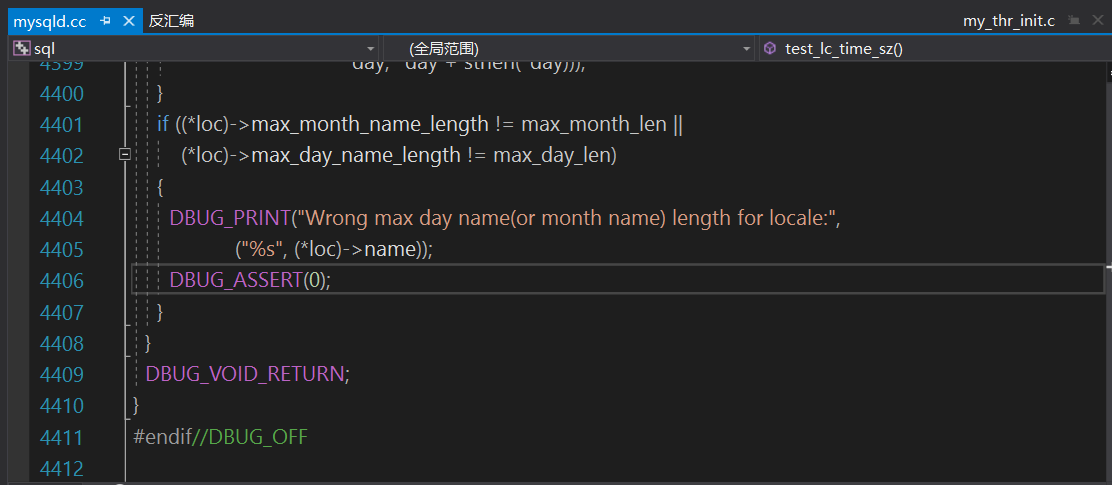
断言错误,根据提示来到mysqld.cc第4406行
Alt text
把DBUG_ASSERT(0)改成DBUG_ASSERT(1)
重新编译一遍,重复执行
再次打开data目录,已经生成相应文件

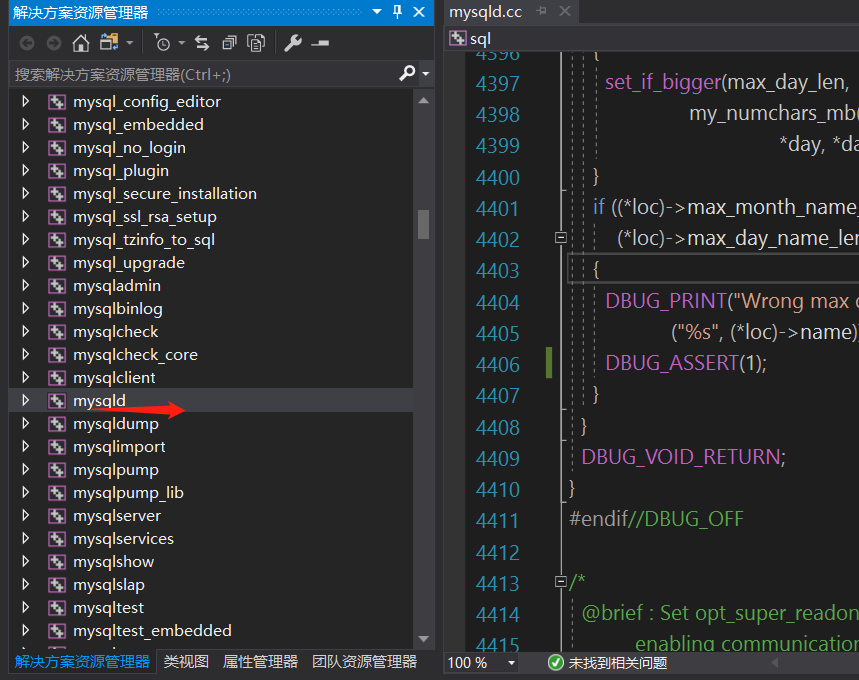
下面开始调试mysqld
Alt text
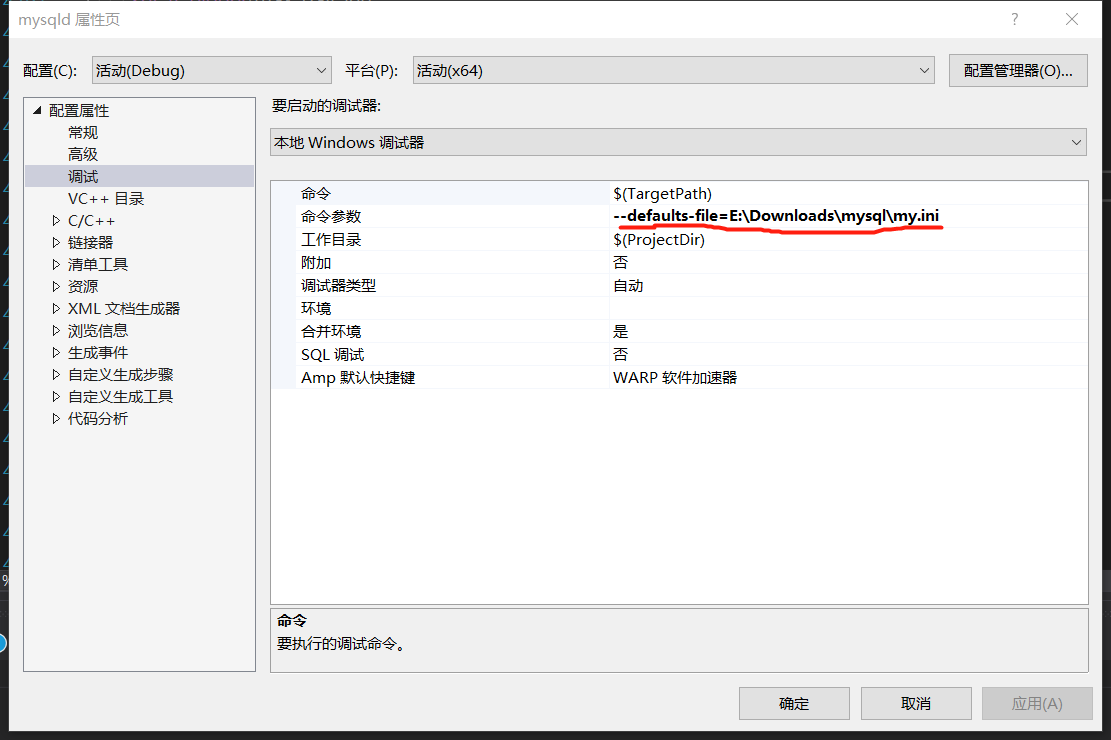
右键->属性
Alt text
命令参数中写上mysql的配置文件路径
my.ini

1
2
3
4
5
6
7
8
9
10
11
12
13
14
15
16
17
18
19
20
21
[mysqld]

port=3307

#basedir=D:\Environment\mysql-8.0.16-winx64

datadir=E:\Downloads\mysql\data

max_connections=200

max_connect_errors=10

character-set-server=utf8

default-storage-engine=INNODB
explicit_defaults_for_timestamp=true

#default_authentication_plugin=mysql_native_password
[mysql]

default-character-set=utf8

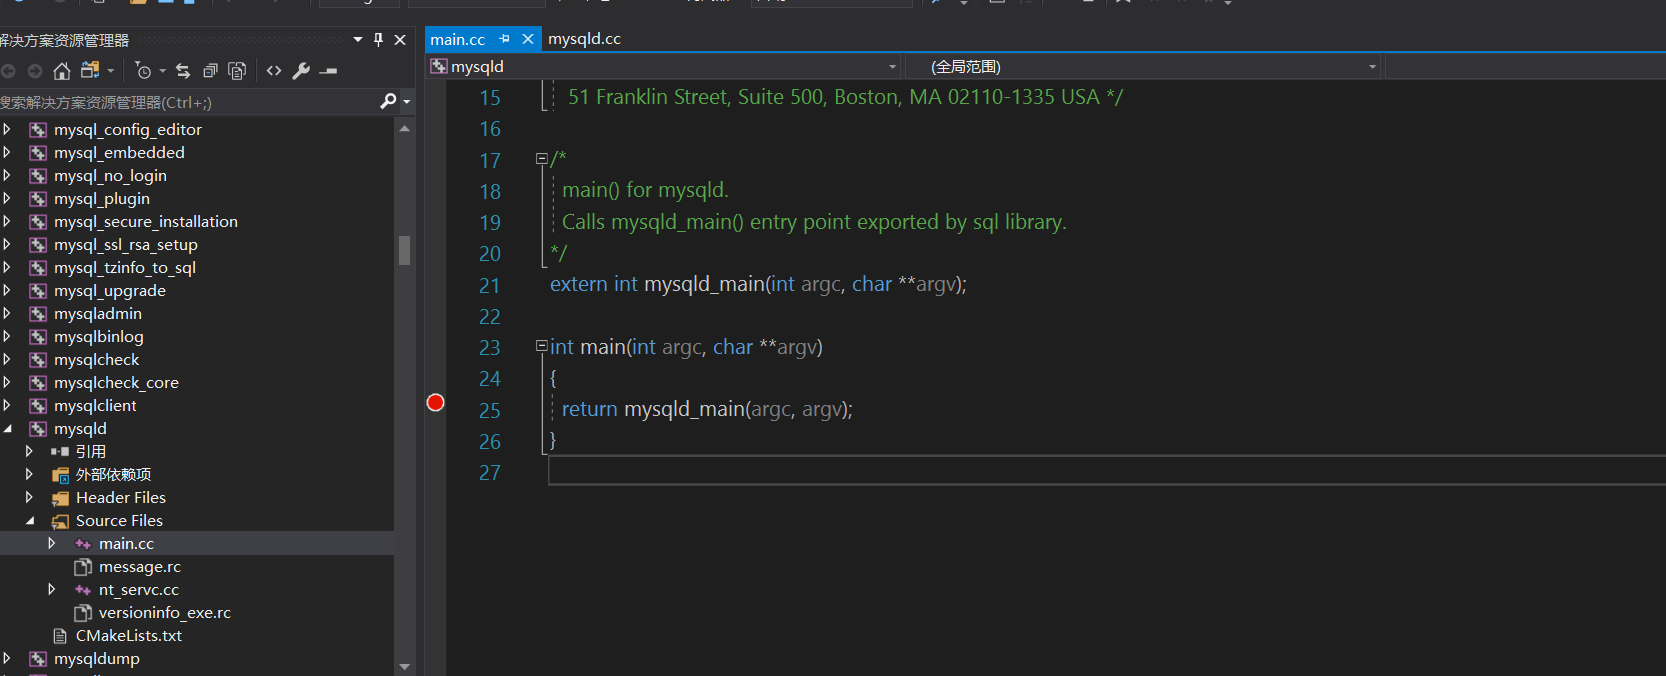
入口函数上打个断点
Alt text

右键->调试->进入并单步执行新实例
Alt text
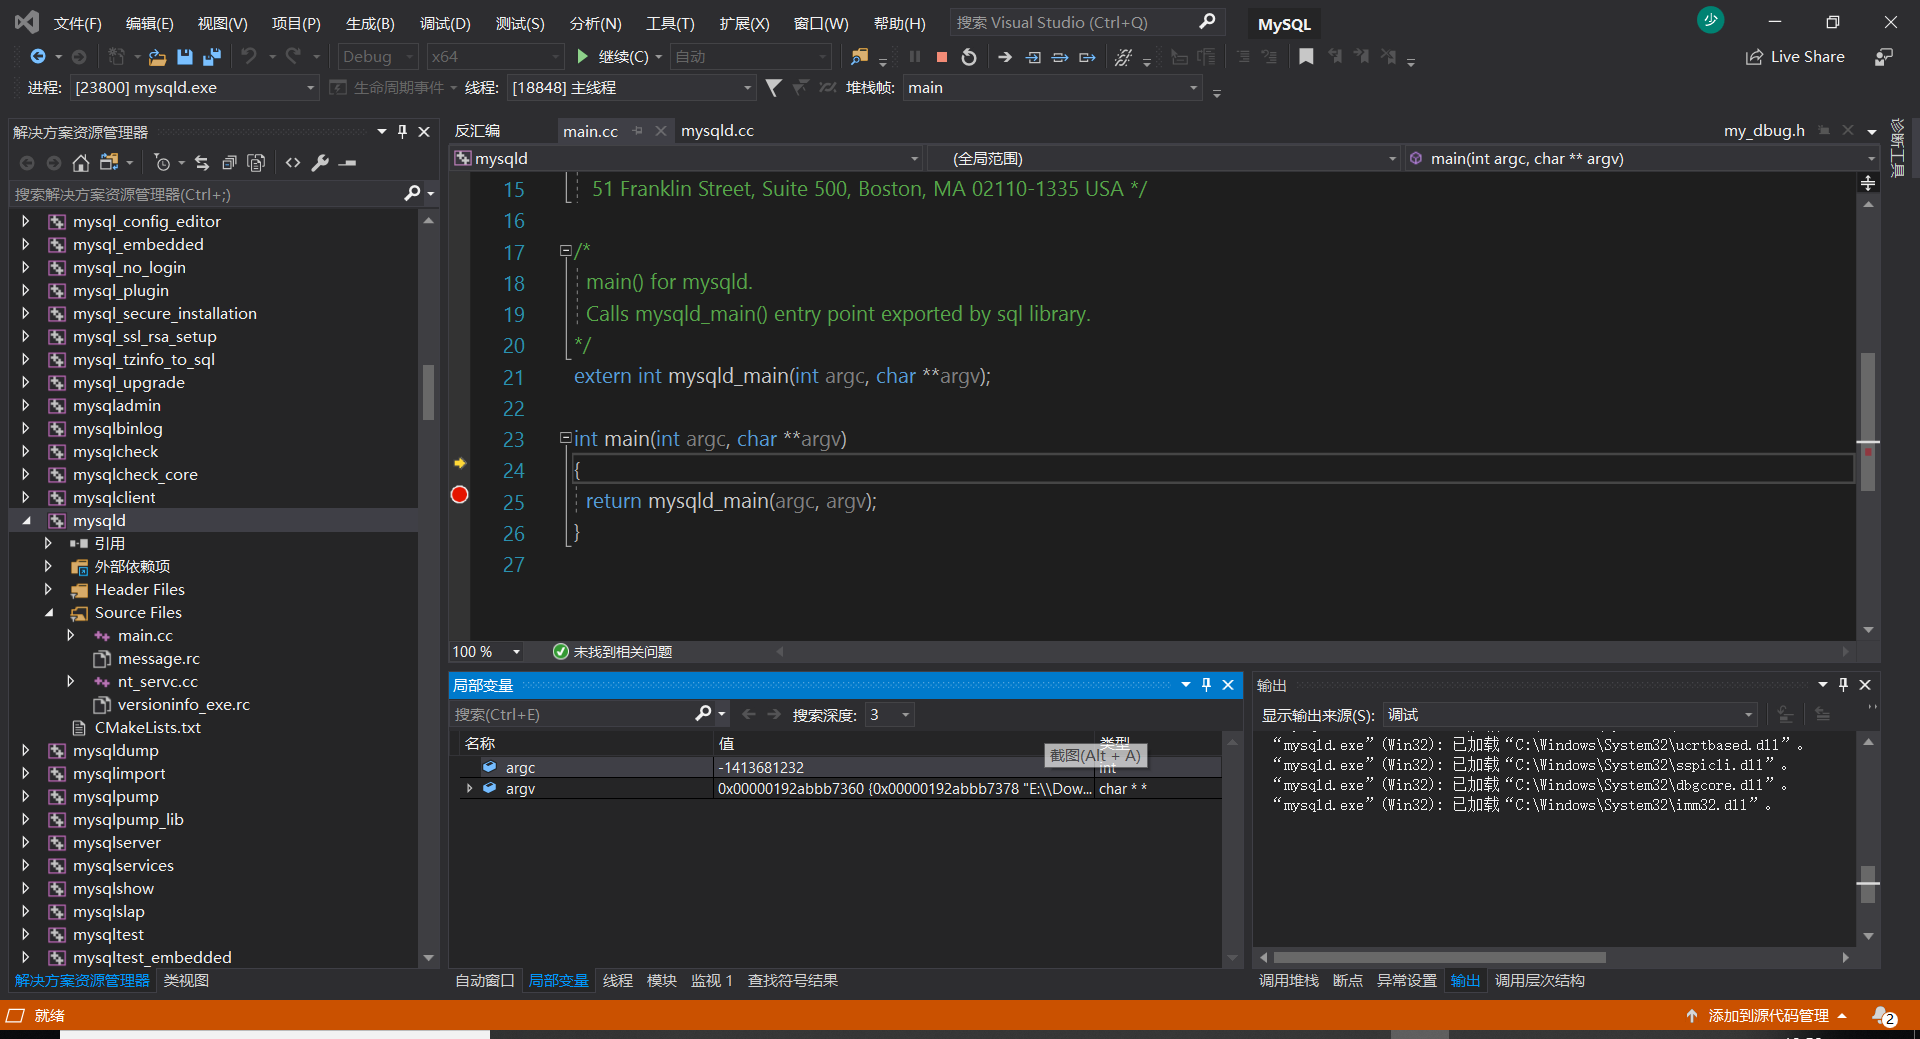
已经进入断点了,接下来慢慢探索吧…

spring日记

发表于 2020-06-12 | 更新于 2021-04-26 | 分类于 后端笔记 | 评论数:
本文字数: 8.1k | 阅读时长 ≈ 7 分钟

-


-

个人笔记,如有描述不当,欢迎留言指出~

spring 日记

Bean

@Scope(作用域注解)

关键属性:

  • scopeName:作用域名,”prototype”、”singleton”、”request”、”session”
  • proxyMode:代理模式,ScopedProxyMode. DEFAULT(默认为NO)、ScopedProxyMode.NO(不代理)、ScopedProxyMode.INTERFACES(基于jdk接口代理)、ScopedProxyMode.TARGET_CLASS(基于cglib代理)

用法:

1
2
3
@Component
@Scope(scopeName="xx",proxyMode=xxx)
public class XXX{}

或者

1
2
3
4
5
6
7
8
@Configuration
public class XXXConfig{
@Bean
@Scope(scopeName="xx",proxyMode=xxx)
public Xxx getXxx(){
return new Xxx();
}
}

NOTE:
若scopeName=”prototype”,proxyMode=ScopedProxyMode.NO,那每次都会得到一个新的bean;
若scopeName=”prototype”,proxyMode=ScopedProxyMode.INTERFACES或TARGET_CLASS, 那么会被注入一个代理类(它是单例并非原型),代理类里根据scopeName来返回具体的bean。
Alt text

缓存

cacheManager

cacheManager(缓存管理器)可以注册多个,但是id必须不同,另外必须指定其中一个cacheManager上加上@Primary,否则CacheAspectSupport(cache切面类)中获取cacheManager bean时返回多个会报错。

Alt text

也可以不指定@Primary,但要注册一个cache配置类继承CachingConfigurerSupport,并覆盖其中cacheManager()方法,返回一个已注册的cacheManager
Alt text

@Cacheable中可以指定cacheManager, 故可以实现不同的缓存方式

EhcacheCacheManage、JcacheCacheManager、RedisCacheManager三者都继承了 AbstractTransactionSupportingCacheManager, 通过设置setTransactionAware(boolean transactionAware)方法,可以实现事务提交后再进行缓存操作(注意,不管事务最后成功与否,缓存都会执行,慎用!!)

redisTemplate

redisTemplate(redis缓存模板)中 setEnableTransactionSupport(boolean enableTransactionSupport)设置开启事务支持,结合@Transactional可以实现缓存回滚

other

若一个方法上同时存在@Cacheable和@Transaction,spring默认cache代理优先级高于transaction,所以会出现先进行cache操作再进行transaction操作的情况。可以通过设置@EnableCaching(order=xxx)、@EnableTransactionManagement(order=xxx)中order值来调节代理顺序,order越小优先级越高。

事务

@TransactionalEventListener

事务事件监听器,一般用于事务提交成功时处理一些业务逻辑
关键属性phase:

  • TransactionPhase.BEFORE_COMMIT 事务提交前触发
  • TransactionPhase.AFTER_COMMIT 事务提交成功时触发
  • TransactionPhase.AFTER_ROLLBACK 事务回滚时触发
  • TransactionPhase.AFTER_COMPLETION 事务完成(事务提交成功后或回滚后触发)
    用法:
1
2
3
4
5
6
7
8
9
10
11
12
13
14
15
16
17
18
19
20
21
22
23
24
25
26
27
28
29
30
31
32
33
34
35
36
37
38
39
40
41
42
43
44
45
46
47
48
public class MyAfterTransactionEvent extends ApplicationEvent {
//自定义一些属性
//...

public MyAfterTransactionEvent(Object... source) {
super(source);
}
}

@Slf4j
@Component
public class MyTransactionListener {
//注入一些bean
//...

@TransactionalEventListener(phase = TransactionPhase.AFTER_COMMIT)
public void onHelloEvent(/** 自定义事件**/MyAfterTransactionEvent event) {
//提交后的业务逻辑
...
}
/**
* 作用同上
**/
@EventListener
void onSaveUserEvent(MyAfterTransactionEvent event) {
TransactionSynchronizationManager.registerSynchronization(new TransactionSynchronizationAdapter() {
@Override
public void afterCommit() {
//提交后的业务逻辑
//...
}
});
}
}

@Service
public class HelloServiceImpl{
@Autowired
private ApplicationEventPublisher publisher;

@Transactional
void test(){
//db操作
//...
publisher.publishEvent(new MyAfterTransactionEvent());
}

}

NOTE: spring事件机制默认是同步的,使用 @TransactionalEventListener不过是异步调用,本质上监听方法的执行和事务是在同一线程中。而上面例子中我们的监听方法在事务提交成功时执行,千万不要在监听方法进行insert/update/delete操作,因为spring的事务是绑定线程的,事务虽然提交了,但仍和当前线程绑定,此时进行增删改操作都是无效的!!详见这篇外文
怎么解决这个问题?目前能想到2种

  • 1:在监听方法里调用异步方法来避免
  • 2:在监听方法上添加@Transactional(propagation = Propagation.REQUIRES_NEW),这样监听方法会创建新的事务

有的人可能会想在监听方法上加@Async,这样监听方法在子线程种执行,子线程不和主线程共享事务,从而解决上述问题。我只能说想法很美好,现实很骨感。前面说了spring的事务是绑定线程的, @TransactionalEventListener是监听当前线程的事务,而子线程中丢失了主线程的任务,结果就是你的监听器不起效

security

我们知道SecurityContextHolder 持有security的context
SecurityContextHolder部分源码:

1
2
3
4
5
6
7
8
9
10
11
12
13
14
15
16
17
18
19
20
21
22
23
24
25
26
27
28
29
30
31
32
33
34
35
36
37
38
39
40
41
42
public class SecurityContextHolder {
public static final String MODE_THREADLOCAL = "MODE_THREADLOCAL"; //线程副本策略
public static final String MODE_INHERITABLETHREADLOCAL = "MODE_INHERITABLETHREADLOCAL";//可继承线程副本策略
public static final String MODE_GLOBAL = "MODE_GLOBAL"; //全局策略
public static final String SYSTEM_PROPERTY = "spring.security.strategy";
private static String strategyName = System.getProperty(SYSTEM_PROPERTY);
private static SecurityContextHolderStrategy strategy;
private static int initializeCount = 0;

static {
initialize();
}
private static void initialize() {
if (!StringUtils.hasText(strategyName)) {
// Set default 如果系统变量读不到,则默认为线程副本策略
strategyName = MODE_THREADLOCAL;
}

if (strategyName.equals(MODE_THREADLOCAL)) {
strategy = new ThreadLocalSecurityContextHolderStrategy();
}
else if (strategyName.equals(MODE_INHERITABLETHREADLOCAL)) {
strategy = new InheritableThreadLocalSecurityContextHolderStrategy();
}
else if (strategyName.equals(MODE_GLOBAL)) {
strategy = new GlobalSecurityContextHolderStrategy();
}
else {
// Try to load a custom strategy 如果都不匹配,那么加载自定义策略,strategyName为自定义策略的类路径,自定义策略需实现SecurityContextHolderStrategy接口
try {
Class<?> clazz = Class.forName(strategyName);
Constructor<?> customStrategy = clazz.getConstructor();
strategy = (SecurityContextHolderStrategy) customStrategy.newInstance();
}
catch (Exception ex) {
ReflectionUtils.handleReflectionException(ex);
}
}

initializeCount++;
}
...

从源码里可以看出,SecurityContextHolder 默认为线程副本策略,这就会导致异步线程中获取不到security的context,解决方法有4种:

  • 1:配置文件中设置 spring.security.strategy=MODE_INHERITABLETHREADLOCAL
  • 2:使用DelegatingSecurityContextRunnable.create(Runnable delegate, SecurityContext securityContext)装饰任务,或者使用DelegatingSecurityContextExecutor创建excutor(线程执行器)
  • 3:和2的方法很像 ,excutor中设置任务装饰器

    1
    2
    3
    4
    5
    6
    7
    8
    9
    10
    11
    12
    13
    14
    15
    16
    17
    18
    19
    20
    21
    22
    23
    24
    25
    26
    27
    28
    /**
    * security 异步任务装饰器
    */
    static class ContextCopyingDecorator implements TaskDecorator {
    @NonNull
    @Override
    public Runnable decorate(@NonNull Runnable runnable) {
    RequestAttributes context = RequestContextHolder.currentRequestAttributes();
    SecurityContext securityContext = SecurityContextHolder.getContext();
    return () -> {
    try {
    RequestContextHolder.setRequestAttributes(context);
    SecurityContextHolder.setContext(securityContext);
    runnable.run();
    } finally {
    SecurityContextHolder.clearContext();
    RequestContextHolder.resetRequestAttributes();
    }
    };
    }
    }

    @Bean
    public Executor createExecutor(){
    ThreadPoolTaskExecutor executor = new ThreadPoolTaskExecutor();
    executor.setTaskDecorator(new ContextCopyingDecorator());
    ...
    }
  • 4:使用spring提供的MethodInvokingFactoryBean修改SecurityContextHolder策略

    1
    2
    3
    4
    5
    6
    7
    8
         @Bean
    public MethodInvokingFactoryBean setSecurityStrategy() {
    MethodInvokingFactoryBean factoryBean = new MethodInvokingFactoryBean();
    factoryBean.setTargetClass(SecurityContextHolder.class);
    factoryBean.setStaticMethod("setStrategyName");
    factoryBean.setArguments(SecurityContextHolder.MODE_INHERITABLETHREADLOCAL);
    return factoryBean;
    }

扩展: 从SecurityContextHolder部分源码中不难看出,SecurityContextHolder在初始化时匹配3种策略名从而生成对应策略,若都没有匹配上,则加载自定义策略,此时strategyName(策略名)为自定义策略的类路径,自定义策略需实现SecurityContextHolderStrategy接口

自定义用户认证

代码实现:

1
2
3
4
5
6
7
8
9
10
11
12
13
14
15
16
17
18
19
20
	//从spring容器中获取UserDetailsService(这个从数据库根据用户名查询用户信息,及加载权限的service)
UserDetailsService userDetailsService =
(UserDetailsService)SpringContextUtil.getBean("userDetailsService");

//根据用户名username加载userDetails
UserDetails userDetails = userDetailsService.loadUserByUsername(username);

//根据userDetails构建新的Authentication,这里使用了
//PreAuthenticatedAuthenticationToken当然可以用其他token,如UsernamePasswordAuthenticationToken
PreAuthenticatedAuthenticationToken authentication =
new PreAuthenticatedAuthenticationToken(userDetails, userDetails.getPassword(),userDetails.getAuthorities());

//设置authentication中details
authentication.setDetails(new WebAuthenticationDetails(request));

//存放authentication到SecurityContextHolder
SecurityContextHolder.getContext().setAuthentication(authentication);
HttpSession session = request.getSession(true);
//在session中存放security context,方便同一个session中控制用户的其他操作
session.setAttribute("SPRING_SECURITY_CONTEXT", SecurityContextHolder.getContext());

rabbitmq消息去重及防丢失解决方案

发表于 2019-03-22 | 更新于 2021-04-26 | 分类于 后端笔记 | 评论数:
本文字数: 13k | 阅读时长 ≈ 12 分钟

-


-

个人笔记,如有描述不当,欢迎留言指出~

前提

我们知道一个电商项目里时刻都有海量的消息通知,比如顾客注册通知、签到通知、下单通知等等,而我们公司的电商项目更加复杂,包含了客户端、门店端以及供应商端三端,各种各样的消息通知游走在各个服务模块间。如果每个模块都要实现一套消息通知的功能,那无疑是多余的。所以我把各模块的消息功能提取出来独立成一个服务模块,就像一个快递员,把各模块的消息准确投递至各端。
我采用了自己熟悉的rabbitmq来实现消息功能,
当模块开发完交差时,组长冷不丁来了句:消息去重以及防丢失机制实现了没?w(゚Д゚)w好吧,赶紧去实现。

消息去重

@消息大致流程
依我的经验来看,在消费端去重比较好。因为即使生产端保证投递到rabbitmq上的消息是不重复的,但rabbitmq服务器有可能由于系统或网络原因导致消息重复推送到消费端,所以生产端去重是不可靠的,应当在消费端去重。

怎么解决呢?我的方案是在生产端投递消息的同时,传入correlationId关联id,在消费端接收消息后,从message的messageProperties中拿到correlationId,再根据correlationId从db中查询是否有相关记录。如果有,则说明这条消息已被我们消费过,直接ack,不进行业务处理;没有,那就把消息内容和correlationId存入表中,然后ack。

这里说明一下,我把消息的接收和业务处理分开来了。消息监听器只负责监听队列消息,并将其存至db中。在另外的任务线程里,从db中取消息记录进去业务处理,如果业务处理中出现异常,结合elasticsearch实现异常报警(这部分还没做,目前还只是记录下错误信息及消息内容)。

why?为啥分开处理,其实一开始的设计中消息接收和处理是写在一起的,消息处理成功回复ack,处理异常回复nack。但会有一个严重的问题,但测试环境中,我们发现总有那么几条消息卡在队列里,就因为处理异常回复nack,消息一直在重入队,严重消耗rabbitmq服务器的性能!所以说,大部分异常的消息,都不能指望把消息重推到别的消费端就能处理成功了,所以消息接收和处理分开来是比较好的。

方案是有了,但具体代码怎么实现呢?
生产端关键代码:

1
2
3
4
5
6
7
8
9
10
11
12
13
14
public void send(String routingKey, String msg) {
RabbitTemplate rabbitTemplate = applicationContext.getBean("rabbitTemplate", RabbitTemplate.class);
rabbitTemplate.setReturnCallback(this);
log.info("消息发送内容 : " + msg);
CorrelationData correlationId = new CorrelationData(UUID.randomUUID().toString());
rabbitTemplate.setConfirmCallback((correlationData, ack, cause) -> {
if (!ack) {
throw new RuntimeException("send error " + cause);
} else {
log.info("send() 消息发送成功 ");
}
});
rabbitTemplate.convertAndSend("amq.topic", routingKey, msg, correlationId);
}

我们点开rabbitTemplate.convertAndSend方法

1
2
3
public void convertAndSend(String exchange, String routingKey, Object object, CorrelationData correlationData) throws AmqpException {
this.send(exchange, routingKey, this.convertMessageIfNecessary(object), correlationData);
}

看到没,convertAndSend方法是以Object来接收消息内容,它内部调用的send方法最终还是把Object类转成Message类
@Message.java
从上图可以看的出,Message包含了ENCODING(编码方式)、SERIALIZER_MESSAGE_CONVERTER(序列化消息转换器)、messageProperties(消息属性)、body(消息内容),队列里消息存放着这些东东。
我们再看看MessageProperties里放着什么

1
2
3
4
5
6
7
8
9
10
11
12
13
14
15
16
17
18
19
20
21
22
23
24
25
26
27
28
29
30
31
32
33
34
35
36
37
38
39
40
41
42
43
44
45
46
47
	public class MessageProperties implements Serializable {
private static final long serialVersionUID = 1619000546531112290L;
public static final String CONTENT_TYPE_BYTES = "application/octet-stream";
public static final String CONTENT_TYPE_TEXT_PLAIN = "text/plain";
public static final String CONTENT_TYPE_SERIALIZED_OBJECT = "application/x-java-serialized-object";
public static final String CONTENT_TYPE_JSON = "application/json";
public static final String CONTENT_TYPE_JSON_ALT = "text/x-json";
public static final String CONTENT_TYPE_XML = "application/xml";
public static final String SPRING_BATCH_FORMAT = "springBatchFormat";
public static final String BATCH_FORMAT_LENGTH_HEADER4 = "lengthHeader4";
public static final String SPRING_AUTO_DECOMPRESS = "springAutoDecompress";
public static final String X_DELAY = "x-delay";
public static final String DEFAULT_CONTENT_TYPE = "application/octet-stream";
public static final MessageDeliveryMode DEFAULT_DELIVERY_MODE;
public static final Integer DEFAULT_PRIORITY;
private final Map<String, Object> headers = new HashMap();
private volatile Date timestamp;
private volatile String messageId;
private volatile String userId;
private volatile String appId;
private volatile String clusterId;
private volatile String type;
private volatile String correlationId;
private volatile String replyTo;
private volatile String contentType = "application/octet-stream";
private volatile String contentEncoding;
private volatile long contentLength;
private volatile boolean contentLengthSet;
private volatile MessageDeliveryMode deliveryMode;
private volatile String expiration;
private volatile Integer priority;
private volatile Boolean redelivered;
private volatile String receivedExchange;
private volatile String receivedRoutingKey;
private volatile String receivedUserId;
private volatile long deliveryTag;
private volatile boolean deliveryTagSet;
private volatile Integer messageCount;
private volatile String consumerTag;
private volatile String consumerQueue;
private volatile Integer receivedDelay;
private volatile MessageDeliveryMode receivedDeliveryMode;
private volatile boolean finalRetryForMessageWithNoId;
private transient volatile Type inferredArgumentType;
private transient volatile Method targetMethod;
private transient volatile Object targetBean;
}

果然correlationId就在这里,然后看到这里我就没继续深入了,原以为rabbitTemplate.convertAndSend方法会自动将correlationId放入messageProperties中,结果表明我错了。在消费端拿到的correlationId为null。也就是说,convertAndSend方法里correlationId根本就没有被放进去的,大家感兴趣的话可以看看源码,这里就不说了。

问题找出来就好办了

1
2
3
4
5
6
7
8
9
10
11
12
13
14
15
16
17
18
public void send(String routingKey, String msg) {
RabbitTemplate rabbitTemplate = applicationContext.getBean("rabbitTemplate", RabbitTemplate.class);
rabbitTemplate.setReturnCallback(this);
log.info("消息发送内容 : " + msg);
CorrelationData correlationId = new CorrelationData(UUID.randomUUID().toString());
rabbitTemplate.setConfirmCallback((correlationData, ack, cause) -> {
if (!ack) {
throw new RuntimeException("send error " + cause);
} else {
log.info("send() 消息发送成功 ");
}
});
Message message = MessageBuilder.withBody(msg.getBytes())
.setContentType(MessageProperties.CONTENT_TYPE_TEXT_PLAIN)
.setCorrelationId(correlationId.toString())
.build();
rabbitTemplate.convertAndSend("amq.topic", routingKey, message, correlationId);
}

直接构建Message类,手动传入correlationId总行了吧。在消费端从Message里拿到correlationId,再从db查询就行了。好了,到这里去重机制就实现了😁

消息防丢失

rabbitmq是支持队列、消息的持久化的。即便rabbitmq突然挂了,那些尚在队列未能推送的消息在rabbitmq重启后也是能够继续推送的,所以丢失问题一般不出现在rabbitmq上。

rabbitmq将消息从队列推到消费端后,需要有一个回应告诉它队列里的这条消息的去留。主要有两种方式:

  • auto: 自动回应,消息在发送给消费端后立即确认
  • manual 手动回应,消息消费正常后由消费端返回ack;或消费异常返回nack,将消息重入队;或返回reject,丢弃该条消息

springboot的yaml配置

1
2
3
4
5
6
7
8
9
10
11
12
rabbitmq:
host: 127.0.0.1
port: 5672
username: admin
password: admin
publisher-confirms: true #开启confirmcallback
publisher-returns: true #开启returncallback
listener:
simple:
acknowledge-mode: manual
direct:
acknowledge-mode: MANUAL

另外,如果消息在消费的时候,消费端与rabbitmq的连接中断了,那这条消息会被重新放回队列进行推送,这个时候我们的去重机制就起作用了;如果消费的时候,消费端死机了,长时间不回应rabbitmq,这时候我们可以将该消息转至死信队列,防止原队列阻塞。死信队列,这里也不做介绍,有兴趣百度呗。
所以消费端出现消息丢失的可能性也不大,问题就可能出在生产端。看看下面这张图
@来源于网络
左边P代表生产端,中间是rabbitmq,右边是消费端,绿色的X是交换机,红色的是队列,用过rabbitmq的小伙伴肯定一目了然了。

rabbitmq 整个消息投递的路径为:
producer->rabbitmq broker cluster->exchange->queue->consumer

生产端投递消息到rabbitmq里,rabbitmq将消息发到交换机中,交换机再根据路由键将消息最终送到队列中,队列取出消息推送到消费端。只有最终抵达队列的消息才是可靠的,不会丢失。所以我们要实现的就是保证生产端的消息务必推送到rabbitmq的队列中。

那么生产端是怎么知道自己的消费准确投递到了队列中呢?rabbitmq返回了两个回调给生产端。

  • message 从 producer 到 rabbitmq broker cluster 则会返回一个 confirmCallback
  • message 从 exchange->queue 投递失败则会返回一个 returnCallback 。我们将利用这两个 callback 控制消息的最终一致性和部分纠错能力。

解决方案

生产端在投递消息前,先将消息内容、投递状态、重试次数记录在db中,然后在两个回调中修改记录状态。另外再开一个任务线程去取db中记录的失败消息,进行重新投递。

代码实现

失败消息记录实体类:

1
2
3
4
5
6
7
8
9
10
11
12
13
14
15
16
17
18
19
20
21
22
23
24
25
26
27
28
29
30
31
32
33
34
35
36
37
38
39
40
41
42
/**
* @time: 2019/2/18 9:14
* @author: hl
* @descripe: 失败消息记录
* @version: 1.0
*/
Entity
@Table(name = "t_failure_mq_record")
@Data
@NoArgsConstructor
@EntityListeners(AuditingEntityListener.class)
public class FailureMqRecord extends Uuid {
/**
* 失败消息内容
*/
private String message;
/**
* 重试次数
*/
@Column(name = "retry_time")
private Integer retryTime;

/**
* 消息状态 1:投递成功 2:投递失败
*/
private Integer status;

/**
* 关联id
*/
private String correlationId;
/**
* 创建时间
*/
@CreatedDate
@Column(name = "create_time", updatable = false)
private Date createTime;

public FailureMqRecord(String message) {
this.message = message;
}
}

rabbitmq发送器:

1
2
3
4
5
6
7
8
9
10
11
12
13
14
15
16
17
18
19
20
21
22
23
24
25
26
27
28
29
30
31
32
33
34
35
36
37
38
39
40
41
42
43
44
45
46
47
48
49
50
51
/**
* @time: 2019/2/13 9:47
* @author: hl
* @descripe:
* @version: 1.0
*/
@Component
@Slf4j
public class RabbitMqSender implements RabbitTemplate.ReturnCallback {
@Autowired
private ApplicationContext applicationContext;
@Autowired
private FailureMqRecordRepository failureMqRecordRepository;

public void send(String routingKey, FailureMqRecord failureMqRecord) {
RabbitTemplate rabbitTemplate = applicationContext.getBean("rabbitTemplate", RabbitTemplate.class);
//设置当前实例为rabbitmqtemplate的returncallback
rabbitTemplate.setReturnCallback(this);
rabbitTemplate.setConfirmCallback(((correlationData1, ack, cause) -> {
if (!ack) { //投递至broker失败
failureMqRecord.setStatus(2);//设为投递失败
failureMqRecordRepository.save(failureMqRecord);
}
}));
Message message = MessageBuilder.withBody(failureMqRecord.getMessage().getBytes())
.setContentType(MessageProperties.CONTENT_TYPE_TEXT_PLAIN)
.setCorrelationId(failureMqRecord.getCorrelationId())
.build();
rabbitTemplate.convertAndSend("amq.topic", routingKey, message, new CorrelationData(failureMqRecord.getCorrelationId()));
failureMqRecord.setStatus(1);//设为投递成功
failureMqRecord.setRetryTime(failureMqRecord.getRetryTime() + 1);//重试次数+1
failureMqRecordRepository.save(failureMqRecord);
}

/**
* 消息由exchang未能正确投递到queue时触发回调
*
* @param message
* @param replyCode
* @param replyText
* @param exchange
* @param routingKey
*/
@Override
public void returnedMessage(Message message, int replyCode, String replyText, String exchange, String routingKey) throws BusinessException {
FailureMqRecord mq = failureMqRecordRepository.findByCorrelationId(message.getMessageProperties().getCorrelationId());
mq.setStatus(2);
failureMqRecordRepository.save(mq);
log.error("审批消息:{} 投递至路由:{}失败", message.getBody(), routingKey);
}
}

任务线程,实现消息重试机制:

1
2
3
4
5
6
7
8
9
10
11
12
13
14
15
16
17
18
19
20
21
22
23
24
25
26
27
28
29
30
31
32
33
34
35
36
37
38
39
40
41
42
43
44
45
46
47
48
49
50
51
52
53
54
55
56
/**
* @time: 2019/2/18 10:10
* @author: huanglong
* @descripe: 消息重发定时器
* @version: 1.0
*/
@Component
@Slf4j
public class MqScheduler {
@Autowired
private RabbitMqSender rabbitMqSender;
@Autowired
private ApprovalMqRepository failureMqRecordRepository;
@Autowired
private RedisDistributedLock redisDistributedLock;

/**
* 每3分钟执行一次
* 将投递失败消息重新投递到rabbitmq
*/
@Scheduled(cron = "* */3 * * * ?")
void push() {
List<FailureMqRecord> failureMqRecords = failureMqRecordRepository.findAll()
.stream()
.filter(failureMqRecord -> {
if (failureMqRecord.getRetryTime() == 3) {
log.error("警告!该消息已重投3次失败,请人工处理,消息记录uuid:{}", failureMqRecord.getUuid());
}
//过滤出重试次数不超过3次、状态为2的消息记录
if (failureMqRecord.getRetryTime() < 3 && failureMqRecord.getStatus() == 0) {
return true;
}
return false;
})
.collect(Collectors.toList());

Iterator<FailureMqRecord> mqIterator = failureMqRecords.iterator();
while (mqIterator.hasNext()) {
FailureMqRecord failureMqRecord = mqIterator.next();
//获取🔒,过期时间5秒,不重复获取
if (redisDistributedLock.lock(failureMqRecord.getUuid(), 5000L, 0, 1000L)) {
// 因为有可能上一个线程刚释放该记录的锁,就被当前先线程获取到该记录的锁,导致记录已被
FailureMqRecord failurelatest = failureMqRecordRepository.findById(failureMqRecord.getUuid()).orElse(null);
ApprovalPushMessage pushMessage = JSON.parseObject(failurelatest.getMessage(), ApprovalPushMessage.class);
//当前时间距离该记录最近一次修改时间的间隔,防止上个线程重试过后,当前线程又重试一次
long lastUpdatePeriod = System.currentTimeMillis() - failurelatest.getUpdateTime().getTime(); //距离上次更新间隔
//重判断记录是否符合条件,重试次数小于3、状态为投递失败、距离上次重试不能少于2分钟
if (failurelatest.getRetryTime() < 3 && failurelatest.getStatus() == 2 && lastUpdatePeriod > 2 * 60 * 1000) {
rabbitMqSender.send("approval.create", failureMqRecord);
}
//释放🔒
redisDistributedLock.releaseLock(failureMqRecord.getUuid());
}
}
}
}

聪明的小伙伴看到这里,会发现任务线程里还用到了分布式🔒。为啥还要加分布式锁,因为是分布式架构啊,会有多个相同定时器从db里取记录处理,如果不加分布式锁,那真的要乱套了。因为redis用的多,就用redis来实现分布式锁了,zookeeper啥的,有空再研究了。redis分布式锁的代码实现,网上有很多资源,我这里就不贴了,嘿嘿

好了,到这里rabbitmq的去重以及防丢失方案已经实现了,如果你有更好的解决方案或者指出我方案的不足,欢迎留言讨论😁

记录一次微服务异步化实现过程

发表于 2019-03-21 | 更新于 2021-04-26 | 分类于 后端笔记 | 评论数:
本文字数: 15k | 阅读时长 ≈ 13 分钟

-


-

个人笔记,如有描述不当,欢迎留言指出~

前提

公司使用springcloud开发微服务,我在开发审批模块中,其中一个新增审批请求中请求了其他几个模块,使用feign接口依次请求,最后发现请求平均耗时1.5s。这速度怎么能忍,于是进行了异步化改造。

异步化

同步版关键代码

1
2
3
4
5
6
7
8
9
10
11
12
13
logger.info("rpc请求开始");
long rpcstart = System.currentTimeMillis();

StoreStaffDTO staffDTO = staffClient.getStaffDTO(userDTO.getUuid()); //获取门店员工信息
SupplierDTO supplierDTO = supplierClient.getSupplierDTO(userDTO.getSupplierCode()); //获取供应商信息
StoreDTO staffStoreDTO = storeClient.getStoreDTO(userDTO.getStoreUuid()); //获取员工所在门店信息
CustomerInfoDTO customerInfoDTO = customerInfoClient.getCustomerInfo(approval.getCustomerUuid()); //获取顾客信息
StoreDTO inStoreDto = ObjectUtils.isEmpty(approval.getInStoreUuid()) ? null : storeClient.getStoreDTO(approval.getInStoreUuid());//获取客户转入门店信息
ServerDto serverDto = ObjectUtils.isEmpty(approval.getServerUuid()) ? null : serveClient.getServeSpecTypeByuuid(approval.getServerUuid()); //获取服务信息
CustAccountDto custAccountDto = ObjectUtils.isEmpty(approval.getCustCardUuid()) ? null : accountClient.getCustAccount(approval.getCustCardUuid()); //获取顾客账户信息

long rpcend = System.currentTimeMillis();
logger.info("rpc请求结束,耗时:{}毫秒", (rpcend - rpcstart));

console
Alt text
Alt text
Alt text

从打印日志中可以看出,由于网络波动性,请求耗时可能只要1秒也可能将近4秒,但rpc请求总是会占总耗时的90%左右,所以影响新增审批的请求的瓶颈就是这些rpc请求,下面我使用异步线程发送这些rpc请求。

异步版关键代码

1
2
3
4
5
6
7
8
9
10
11
12
13
14
15
16
17
18
19
20
21
22
23
24
25
26
27
28
29
30
31
32
33
34
35
36
37
38
39
40
41
42
43
44
45
46
47
48
49
50
51
52
53
54
55
56
57
58
59
60
61
62
63
64
65
66
67
68
69
70
71
72
73
74
75
76
77
78
79
80
81
82
83
84
85
86
87
88
89
90
91
92
93
94
95
96
97
98
99
100
101
102
logger.info("rpc请求开始");
long rpcstart = System.currentTimeMillis();

Approval approvalFina = approval;
CompletableFuture<StoreDTO> storeDTOCompletableFuture = CompletableFuture.supplyAsync(() -> {
try {
logger.info("当前线程名:{}", Thread.currentThread().getName());
return storeClient.getStoreDTO(userDTO.getStoreUuid());
} catch (Exception e) {
logger.error("获取门店信息rpc错误,原因:", e);
throw e;
}
});
CompletableFuture<StoreDTO> inStoreDTOCompletableFuture = CompletableFuture.supplyAsync(() -> {
try {
logger.info("当前线程名:{}", Thread.currentThread().getName());
if (!ObjectUtils.isEmpty(approvalFina.getInStoreUuid())) {
return storeClient.getStoreDTO(approvalFina.getInStoreUuid());
}
return null;
} catch (Exception e) {
logger.error("获取转入门店信息rpc错误,原因:{}", e);
throw e;
}
});
CompletableFuture<SupplierDTO> supplierDTOCompletableFuture = CompletableFuture.supplyAsync(() -> {
try {
logger.info("当前线程名:{}", Thread.currentThread().getName());
return supplierClient.getSupplierDTO(userDTO.getSupplierCode());
} catch (Exception e) {
logger.error("获取供应商信息rpc错误,原因:{}", e);
throw e;
}
});
CompletableFuture<StoreStaffDTO> staffDTOCompletableFuture = CompletableFuture.supplyAsync(() -> {
try {
logger.info("当前线程名:{}", Thread.currentThread().getName());
return staffClient.getStaffDTO(userDTO.getUuid());
} catch (Exception e) {
logger.error("获取门店员工信息rpc错误,原因:{}", e);
throw e;
}
});
CompletableFuture<CustomerInfoDTO> customerInfoDTOCompletableFuture = CompletableFuture.supplyAsync(() -> {
try {
logger.info("当前线程名:{}", Thread.currentThread().getName());
return customerInfoClient.getCustomerInfo(approvalFina.getCustomerUuid());
} catch (Exception e) {
logger.error("获取顾客信息rpc错误,原因:{}", e);
throw e;
}
});
CompletableFuture<ServerDto> serverDtoCompletableFuture = CompletableFuture.supplyAsync(() -> {
try {
logger.info("当前线程名:{}", Thread.currentThread().getName());
if (!ObjectUtils.isEmpty(approvalFina.getServerUuid())) {
return serveClient.getServeSpecTypeByuuid(approvalFina.getServerUuid());
}
return null;
} catch (Exception e) {
logger.error("获取服务信息rpc错误,原因:{}", e);
throw e;
}
});
CompletableFuture<CustAccountDto> custAccountDtoCompletableFuture = CompletableFuture.supplyAsync(() -> {
try {
logger.info("当前线程名:{}", Thread.currentThread().getName());
if (!ObjectUtils.isEmpty(approvalFina.getCustCardUuid())) {
return accountClient.getCustAccount(approvalFina.getCustCardUuid());
}
return null;
} catch (Exception e) {
logger.error("获取顾客账户信息rpc错误,原因:{}", e);
throw e;
}
});
CompletableFuture.allOf(storeDTOCompletableFuture, inStoreDTOCompletableFuture, serverDtoCompletableFuture,
supplierDTOCompletableFuture, staffDTOCompletableFuture, customerInfoDTOCompletableFuture, custAccountDtoCompletableFuture);

StoreStaffDTO staffDTO = null;//员工信息
SupplierDTO supplierDTO = null; //供应商信息
StoreDTO staffStoreDTO = null;//员工所在门店信息
CustomerInfoDTO customerInfoDTO = null; //顾客信息
StoreDTO inStoreDto = null;//顾客转入门店信息
ServerDto serverDto = null; //服务信息
CustAccountDto custAccountDto = null; //顾客账户信息
try {
staffStoreDTO = storeDTOCompletableFuture.get();
inStoreDto = inStoreDTOCompletableFuture.get();
staffDTO = staffDTOCompletableFuture.get();
supplierDTO = supplierDTOCompletableFuture.get();
customerInfoDTO = customerInfoDTOCompletableFuture.get();
serverDto = serverDtoCompletableFuture.get();
custAccountDto = custAccountDtoCompletableFuture.get();
} catch (InterruptedException e) {
logger.error("线程中断错误信息:{}", e);
} catch (ExecutionException e) {
logger.error("线程执行错误信息:{}", e);
}

long rpcend = System.currentTimeMillis();
logger.info("rpc请求结束,耗时:{}毫秒", (rpcend - rpcstart));

console
Alt text

exception分析

what😨!竟然报未授权登录异常,不可能,feign请求里应该是带了请求头阿,下面拓展一些知识。

知识拓展

completableFuture

completableFuture扩展了Future的功能,并且实现了线程间同步的功能,我们用它提供的语法,可以很简单的实现异步编程。

oauth2

框架里引用了spring security以及oauth2来实现授权认证服务,所以客户请求是要带上Authorization请求头的。

feign

feign的本质,其实就是使用httpclient帮我们封装好了http请求。所以调用feign接口的方法就是发起一次http请求而已。如果不做处理的,那么feign发送的http请求里是没有Authorization请求头的。

RequestInterceptor

RequestInterceptor是feign提供的一个拦截器
放出我的配置:

1
2
3
4
5
6
7
8
9
10
11
12
13
14
15
@Configuration
public class FeignOauth2RequestInterceptor implements RequestInterceptor {
private final String AUTHORIZATION_HEADER = "Authorization";
private final String BEARER_TOKEN_TYPE = "Bearer";

@Override
public void apply(RequestTemplate requestTemplate) {
SecurityContext securityContext = SecurityContextHolder.getContext();
Authentication authentication = securityContext.getAuthentication();
if (authentication != null && authentication.getDetails() instanceof OAuth2AuthenticationDetails) {
OAuth2AuthenticationDetails details = (OAuth2AuthenticationDetails) authentication.getDetails();
requestTemplate.header(AUTHORIZATION_HEADER, String.format("%s %s", BEARER_TOKEN_TYPE, details.getTokenValue()));
}
}
}

拦截器的作用就是从securityContext拿到当前请求用户的认证信息authentication,然后为feign的请求模板·requestTemplate·赋上Authorization请求头。

断点跟踪

断点1

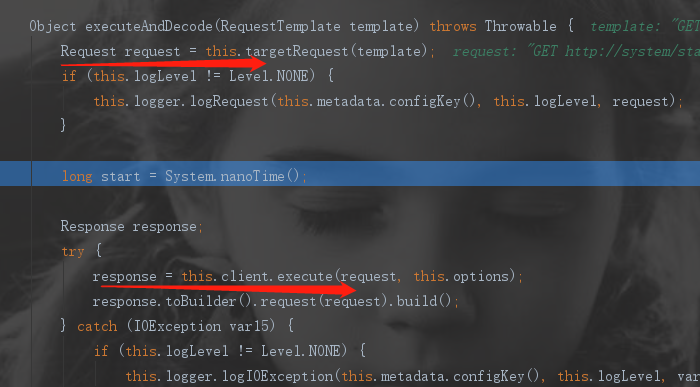
打个断点跟进,看看拦截后feign执行了哪些操作,关键位置如下图:
Alt text
可以看到feign将requestTemplate封装成request对象,并最终被client执行得到response,里面详细细节就不深入。从这里我们可以知道,调用feign发送的请求是携带Authorization请求头的,这样模块间发起请求就不会报未授权错误了。
@完整的请求流程

断点2

所以按道理是不应该报用户未登录授权异常的,所以我们在拦截器打个端点,看看requestTemplate到底有没有被赋上请求头。
Alt text
what😮!这不是推翻了我的认知吗,眼神逐渐呆滞😑
开个玩笑,authentication从securityContext里获取,securityContext从SecurityContextHolder静态方法中获取
@SecurityContextHolder

从图中可以看出securityContext是从strategy里拿到的。
SecurityContextHolderStrategy是spring security安全上下文的存取策略。SecurityContextHolderStrategy接口有三个实现类,对应三种实现策略:

  • GlobalSecurityContextHolderStrategy:使用 一个静态变量存放securityContext
  • ThreadLocalSecurityContextHolderStrategy:使用ThreadLocal存放securityContext
  • InheritableThreadLocalSecurityContextHolderStrategy:使用InheritableThreadLocal存放securityContext
    断点3
    那我当前环境里SecurityContextHolder里使用的是哪个策略呢,打个断点
    @SecurityContextHolder

恍然大悟!🤣原来采用的是ThreadLocalSecurityContextHolderStrategy
还记得我异步改造里怎么写的吗

1
2
3
4
5
6
7
8
9
CompletableFuture<StoreDTO> storeDTOCompletableFuture = CompletableFuture.supplyAsync(() -> {
try {
logger.info("当前线程名:{}", Thread.currentThread().getName());
return storeClient.getStoreDTO(userDTO.getStoreUuid());
} catch (Exception e) {
logger.error("获取门店信息rpc错误,原因:", e);
throw e;
}
});

我将调用feign请求代码写在CompletableFuture.supplyAsync(()->{})中,而CompletableFuture里默认线程池会分配新线程去执行任务,所以新线程里是没有securityContext的线程副本的!所以在拦截器里才会取到空的securityContext,最终报未授权登录异常!bingo😎

最终异步版关键代码

1
2
3
4
5
6
7
8
9
10
11
12
13
14
15
16
17
18
19
20
21
22
23
24
25
26
27
28
29
30
31
32
33
34
35
36
37
38
39
40
41
42
43
44
45
46
47
48
49
50
51
52
53
54
55
56
57
58
59
60
61
62
63
64
65
66
67
68
69
70
71
72
73
74
75
76
77
78
79
80
81
82
83
84
85
86
87
88
89
90
91
92
93
94
95
96
97
98
99
100
101
102
103
104
105
106
107
108
109
110
111
112
logger.info("rpc请求开始");
long rpcstart = System.currentTimeMillis();

SecurityContext securityContext = SecurityContextHolder.getContext();//从当前请求线程中拿到securityContext安全上下文
Approval approvalFina = approval;
CompletableFuture<StoreDTO> storeDTOCompletableFuture = CompletableFuture.supplyAsync(() -> {
try {
logger.info("当前线程名:{}", Thread.currentThread().getName());
SecurityContextHolder.setContext(securityContext); //设置securityContext安全上下文线程副本
return storeClient.getStoreDTO(userDTO.getStoreUuid());
} catch (Exception e) {
logger.error("获取门店信息rpc错误,原因:", e);
throw e;
}
});
CompletableFuture<StoreDTO> inStoreDTOCompletableFuture = CompletableFuture.supplyAsync(() -> {
try {
logger.info("当前线程名:{}", Thread.currentThread().getName());
if (!ObjectUtils.isEmpty(approvalFina.getInStoreUuid())) {
SecurityContextHolder.setContext(securityContext);
return storeClient.getStoreDTO(approvalFina.getInStoreUuid());
}
return null;
} catch (Exception e) {
logger.error("获取转入门店信息rpc错误,原因:{}", e);
throw e;
}
});
CompletableFuture<SupplierDTO> supplierDTOCompletableFuture = CompletableFuture.supplyAsync(() -> {
try {
logger.info("当前线程名:{}", Thread.currentThread().getName());
SecurityContextHolder.setContext(securityContext);
return supplierClient.getSupplierDTO(userDTO.getSupplierCode());
} catch (Exception e) {
logger.error("获取供应商信息rpc错误,原因:{}", e);
throw e;
}
});
CompletableFuture<StoreStaffDTO> staffDTOCompletableFuture = CompletableFuture.supplyAsync(() -> {
try {
logger.info("当前线程名:{}", Thread.currentThread().getName());
SecurityContextHolder.setContext(securityContext);
return staffClient.getStaffDTO(userDTO.getUuid());
} catch (Exception e) {
logger.error("获取门店员工信息rpc错误,原因:{}", e);
throw e;
}
});
CompletableFuture<CustomerInfoDTO> customerInfoDTOCompletableFuture = CompletableFuture.supplyAsync(() -> {
try {
logger.info("当前线程名:{}", Thread.currentThread().getName());
SecurityContextHolder.setContext(securityContext);
return customerInfoClient.getCustomerInfo(approvalFina.getCustomerUuid());
} catch (Exception e) {
logger.error("获取顾客信息rpc错误,原因:{}", e);
throw e;
}
});
CompletableFuture<ServerDto> serverDtoCompletableFuture = CompletableFuture.supplyAsync(() -> {
try {
logger.info("当前线程名:{}", Thread.currentThread().getName());
if (!ObjectUtils.isEmpty(approvalFina.getServerUuid())) {
SecurityContextHolder.setContext(securityContext);
return serveClient.getServeSpecTypeByuuid(approvalFina.getServerUuid());
}
return null;
} catch (Exception e) {
logger.error("获取服务信息rpc错误,原因:{}", e);
throw e;
}
});
CompletableFuture<CustAccountDto> custAccountDtoCompletableFuture = CompletableFuture.supplyAsync(() -> {
try {
logger.info("当前线程名:{}", Thread.currentThread().getName());
if (!ObjectUtils.isEmpty(approvalFina.getCustCardUuid())) {
SecurityContextHolder.setContext(securityContext);
return accountClient.getCustAccount(approvalFina.getCustCardUuid());
}
return null;
} catch (Exception e) {
logger.error("获取顾客账户信息rpc错误,原因:{}", e);
throw e;
}
});
CompletableFuture.allOf(storeDTOCompletableFuture, inStoreDTOCompletableFuture, serverDtoCompletableFuture,
supplierDTOCompletableFuture, staffDTOCompletableFuture, customerInfoDTOCompletableFuture, custAccountDtoCompletableFuture);


StoreStaffDTO staffDTO = null;//员工信息
SupplierDTO supplierDTO = null; //供应商信息
StoreDTO staffStoreDTO = null;//员工所在门店信息
CustomerInfoDTO customerInfoDTO = null; //顾客信息
StoreDTO inStoreDto = null;//顾客转入门店信息
ServerDto serverDto = null; //服务信息
CustAccountDto custAccountDto = null; //顾客账户信息

try {
staffStoreDTO = storeDTOCompletableFuture.get();
inStoreDto = inStoreDTOCompletableFuture.get();
staffDTO = staffDTOCompletableFuture.get();
supplierDTO = supplierDTOCompletableFuture.get();
customerInfoDTO = customerInfoDTOCompletableFuture.get();
serverDto = serverDtoCompletableFuture.get();
custAccountDto = custAccountDtoCompletableFuture.get();
} catch (InterruptedException e) {
logger.error("线程中断错误信息:{}", e);
} catch (ExecutionException e) {
logger.error("线程执行错误信息:{}", e);
}

long rpcend = System.currentTimeMillis();
logger.info("rpc请求结束,耗时:{}毫秒", (rpcend - rpcstart));

console
Alt text
Alt text

可以看到rpc请求的耗时被平均缩短到500毫秒内😁

CompletableFuture学习可以看这篇👉here,我觉得这位博主写的还行。

安装rabbitmq碰到的一些错误

发表于 2018-08-25 | 更新于 2021-04-26 | 分类于 问题总结篇 | 评论数:
本文字数: 1.4k | 阅读时长 ≈ 1 分钟


个人笔记,如有描述不当,欢迎留言指出~

安装请看我的这篇windows下安装rabbitmq

the first and the last!!!

你觉得rabbitmq服务启动没报错就大功告成了?no,you’re so naive
我尝试run rabbitmq-plugin enable rabbitmq_management来开启管理插件,但是并不能打开管理页面,而且rabbitmqctl的相关命令也都报错。为此我翻遍了国内大大小小的论坛博客,解决方案是五花八门,但仍不能完全解决我的问题,所以我开始怀疑人生。
当我一筹莫展时,我留意到其中一个错误
run rabbitmqctl status时,错误提示是这样的:

1
Starting node rabbit@DESKTOP-0S1RKNE ... ** (ArgumentError) argument error (stdlib) io_lib.erl:170: :io_lib.format(' * effective user\'s home directory: ~s~n', [[67, 58, 92, 85, 115, 101, 114, 115, 92, 19975, 23480, 26827]]) src/rabbit_misc.erl:670: :rabbit_misc."-format_many/1-lc$^0/1-0-"/1 src/rabbit_misc.erl:670: :rabbit_misc."-format_many/1-lc$^0/1-0-"/1 src/rabbit_misc.erl:670: :rabbit_misc.format_many/1 (rabbitmqctl) lib/rabbitmqctl.ex:349: RabbitMQCtl.get_node_diagnostics/1 (rabbitmqctl) lib/rabbitmqctl.ex:307: RabbitMQCtl.format_error/3 (rabbitmqctl) lib/rabbitmqctl.ex:43: RabbitMQCtl.main/1 (elixir) lib/kernel/cli.ex:76: anonymous fn/3 in Kernel.CLI.exec_fun/2

看字面意思是我参数错误,我一开始没明白什么意思
直到我在stack overflow 上看到跟我同样的错误,不像国内论坛上尽说些有的没的,人老外就简单的这么一句
Alt text

如果你的用户名不是英文,把它改成英文。

再回顾下错误提示,原来是路径参数错了。
唉,啥也不说了,悔不当初啊,就不该设置中文用户名!!

如何修改用户名及用户文件夹名,我是参考这篇博文的https://blog.csdn.net/zhang_jinhe/article/details/40624847
然后卸载rabbitmq重装,所有问题都解决了✌

feeling

我们往往认为错误多是因为错误因素多,但其实一个错误往往是由另一个错误引起的,它本身其实并不是错误因素。所以在解决问题的时候,不能盲目地企图去查找所有错误因素,而是应该花时间去找到那个关键因素,解决它,那剩下的错误就悉数解决了。moreover,英语能力也很重要哈😄

windows下安装rabbitmq

发表于 2018-08-25 | 更新于 2021-04-26 | 分类于 环境安装篇 | 评论数:
本文字数: 1.4k | 阅读时长 ≈ 1 分钟


个人笔记,如有描述不当,欢迎留言指出~

erlang

rabbitmq是基于erlang开发,安装rabbitmq前必须安装erlang环境

  • 下载erlang20.1并安装
  • 安装后切记配置环境变量,新建系统环境变量ERLANG_HOME,值为你erlang的安装路径(如F:\Environment\erl9.1),然后向系统环境变量path追加内容%ERLANG_HOME%\bin

rabbitmq

安装

下载rabbitmq3.7.3并安装

erlang和rabbitmq不同版本间搭配可能存在bug,但至少我装的erlang20.1和rabbitmq3.7.3是没问题的

环境变量

新建系统环境变量RABBITMQ_SERVER,值为你rabbitmq的安装路径(如F:\Environment\RabbitMQ\rabbitmq_server-3.7.3),然后向系统环境变量path追加内容%RABBITMQ_SERVER%\sbin

同步Erlang Cookies

这是最重要的一步,rabbitmq 的集群节点和命令行工具都是使用了erlang cookies来作为认证的

这个cookie文件有两份,这两份cookie内容要保持一致

  • erlang20.2之前:
    • 一份在C:\Users\%USERNAME%\.erlang.cookie
    • 一份在C:\Windows\.erlang.cookie
  • erlang20.2之后:
    • 一份在C:\Users\%USERNAME%\.erlang.cookie
    • 一份在C:\WINDOWS\system32\config\systemprofile\.erlang.cookie

安装服务并运行

rabbitmq在安装时默认启动了服务,但这个服务可能会有问题,比如上面说的cookie要一致,如果不一致便启动了服务,那这个服务肯定是有问题的。

第一步

1
2
3
4
5
6
7
#切记管理员身份
f: #进入f盘
cd F:\Environment\RabbitMQ\rabbitmq_server-3.7.3\sbin #进入rabbitmq批处理目录
rabbitmq-service stop #停止rabbitmq服务
rabbitmq-service remove #删除rabbitmq服务
rabbitmq-service install #安装rabbitmq服务
rabbitmq-service start #启动rabbitmq服务

如下图所示:
Alt text

第二步

1
rabbitmqctl status #查看rabbitmq服务器状态

如下图所示:
Alt text

第三步

1
rabbitmq-plugins enable rabbitmq_management #开启rabbitmq管理插件

如果你之前已经开启了插件,那么不会有变化,如下图所示:
Alt text

如果你之前没有开启插件,如下图所示:
Alt text

第四步

1
2
rabbitmq-service stop #停止rabbitmq服务
rabbitmq-service start #启动rabbitmq服务使配置生效

最后

在浏览器地址栏中输入http://localhost:15672,打开rabbitmq管理登录页面,默认用户名:guest,密码:guest
Alt text
Alt text

更多rabbitmq的详细安装介绍,see manual,以后有空我会翻译下这篇文章(^_^)

AVL树之c++实现

发表于 2018-08-18 | 更新于 2021-04-26 | 分类于 算法篇 | 评论数:
本文字数: 16k | 阅读时长 ≈ 15 分钟


个人笔记,如有描述不当,欢迎留言指出~

头文件AVLTree.h

1
2
3
4
5
6
7
8
9
10
11
12
13
14
15
16
17
18
19
20
21
22
23
24
25
26
27
28
29
30
31
32
33
34
35
36
37
38
39
40
41
42
43
44
45
46
47
48
49
50
51
52
53
54
55
56
57
58
59
60
61
62
63
64
65
66
67
68
69
70
71
72
73
74
75
76
77
78
79
80
81
82
83
84
85
86
87
88
89
90
91
92
93
94
95
96
97
98
99
100
101
102
103
#ifndef _AVL_TREE_HPP_
#define _AVL_TREE_HPP_

template <class T>
class AVLTreeNode{
public:
T key; // 关键字(键值)
int height; // 高度
AVLTreeNode *left; // 左孩子
AVLTreeNode *right; // 右孩子

AVLTreeNode(T value, AVLTreeNode *l, AVLTreeNode *r):
key(value), height(0),left(l),right(r){}
};

template <class T>
class AVLTree {
private:
AVLTreeNode<T> *mRoot; // 根结点

public:
AVLTree();
~AVLTree();

// 获取树的高度
int height();
// 获取树的高度
int max(int a, int b);

// 前序遍历"AVL树"
void preOrder();
// 中序遍历"AVL树"
void inOrder();
// 后序遍历"AVL树"
void postOrder();

// (递归实现)查找"AVL树"中键值为key的节点
AVLTreeNode<T>* search(T key);
// (非递归实现)查找"AVL树"中键值为key的节点
AVLTreeNode<T>* iterativeSearch(T key);

// 查找最小结点:返回最小结点的键值。
T minimum();
// 查找最大结点:返回最大结点的键值。
T maximum();

// 将结点(key为节点键值)插入到AVL树中
void insert(T key);

// 删除结点(key为节点键值)
void remove(T key);

// 销毁AVL树
void destroy();

// 打印AVL树
void print();
private:
// 获取树的高度
int height(AVLTreeNode<T>* tree) ;

// 前序遍历"AVL树"
void preOrder(AVLTreeNode<T>* tree) const;
// 中序遍历"AVL树"
void inOrder(AVLTreeNode<T>* tree) const;
// 后序遍历"AVL树"
void postOrder(AVLTreeNode<T>* tree) const;

// (递归实现)查找"AVL树x"中键值为key的节点
AVLTreeNode<T>* search(AVLTreeNode<T>* x, T key) const;
// (非递归实现)查找"AVL树x"中键值为key的节点
AVLTreeNode<T>* iterativeSearch(AVLTreeNode<T>* x, T key) const;

// 查找最小结点:返回tree为根结点的AVL树的最小结点。
AVLTreeNode<T>* minimum(AVLTreeNode<T>* tree);
// 查找最大结点:返回tree为根结点的AVL树的最大结点。
AVLTreeNode<T>* maximum(AVLTreeNode<T>* tree);

// LL:左左对应的情况(左单旋转)。
AVLTreeNode<T>* leftLeftRotation(AVLTreeNode<T>* k2);

// RR:右右对应的情况(右单旋转)。
AVLTreeNode<T>* rightRightRotation(AVLTreeNode<T>* k1);

// LR:左右对应的情况(左双旋转)。
AVLTreeNode<T>* leftRightRotation(AVLTreeNode<T>* k3);

// RL:右左对应的情况(右双旋转)。
AVLTreeNode<T>* rightLeftRotation(AVLTreeNode<T>* k1);

// 将结点(z)插入到AVL树(tree)中
AVLTreeNode<T>* insert(AVLTreeNode<T>* &tree, T key);

// 删除AVL树(tree)中的结点(z),并返回被删除的结点
AVLTreeNode<T>* remove(AVLTreeNode<T>* &tree, AVLTreeNode<T>* z);

// 销毁AVL树
void destroy(AVLTreeNode<T>* &tree);

// 打印AVL树
void print(AVLTreeNode<T>* tree, T key, int direction);
};
#endif

源文件 AVLTree.cpp

1
2
3
4
5
6
7
8
9
10
11
12
13
14
15
16
17
18
19
20
21
22
23
24
25
26
27
28
29
30
31
32
33
34
35
36
37
38
39
40
41
42
43
44
45
46
47
48
49
50
51
52
53
54
55
56
57
58
59
60
61
62
63
64
65
66
67
68
69
70
71
72
73
74
75
76
77
78
79
80
81
82
83
84
85
86
87
88
89
90
91
92
93
94
95
96
97
98
99
100
101
102
103
104
105
106
107
108
109
110
111
112
113
114
115
116
117
118
119
120
121
122
123
124
125
126
127
128
129
130
131
132
133
134
135
136
137
138
139
140
141
142
143
144
145
146
147
148
149
150
151
152
153
154
155
156
157
158
159
160
161
162
163
164
165
166
167
168
169
170
171
172
173
174
175
176
177
178
179
180
181
182
183
184
185
186
187
188
189
190
191
192
193
194
195
196
197
198
199
200
201
202
203
204
205
206
207
208
209
210
211
212
213
214
215
216
217
218
219
220
221
222
223
224
225
226
227
228
229
230
231
232
233
234
235
236
237
238
239
240
241
242
243
244
245
246
247
248
249
250
251
252
253
254
255
256
257
258
259
260
261
262
263
264
265
266
267
268
269
270
271
272
273
274
275
276
277
278
279
280
281
282
283
284
285
286
287
288
289
290
291
292
293
294
295
296
297
298
299
300
301
302
303
304
305
306
307
308
309
310
311
312
313
314
315
316
317
318
319
320
321
322
323
324
325
326
327
328
329
330
331
332
333
334
335
336
337
338
339
340
341
342
343
344
345
346
347
348
349
350
351
352
353
354
355
356
357
358
359
360
361
362
363
364
365
366
367
368
369
370
371
372
373
374
375
376
377
378
379
380
381
382
383
384
385
386
387
388
389
390
391
392
393
394
395
396
397
398
399
400
401
402
403
404
405
406
407
408
409
410
411
412
413
414
415
416
417
418
419
420
421
422
423
424
425
426
427
428
429
430
431
432
433
434
435
436
437
438
439
440
441
442
443
444
445
446
447
448
449
450
451
452
453
454
455
456
457
458
459
460
461
462
463
464
#include "AVLTree.h"
#include <iomanip>
#include <iostream>
using namespace std;

/*
* 构造函数
*/
template <class T>
AVLTree<T>::AVLTree():mRoot(NULL)
{
}

/*
* 析构函数
*/
template <class T>
AVLTree<T>::~AVLTree()
{
destroy(mRoot);
}

/*
* 获取树的高度
*/
template <class T>
int AVLTree<T>::height(AVLTreeNode<T>* tree)
{
if (tree != NULL)
return tree->height;

return 0;
}

template <class T>
int AVLTree<T>::height()
{
return height(mRoot);
}
/*
* 比较两个值的大小
*/
template <class T>
int AVLTree<T>::max(int a, int b)
{
return a>b ? a : b;
}

/*
* 前序遍历"AVL树"
*/
template <class T>
void AVLTree<T>::preOrder(AVLTreeNode<T>* tree) const
{
if(tree != NULL)
{
cout<< tree->key << " " ;
preOrder(tree->left);
preOrder(tree->right);
}
}

template <class T>
void AVLTree<T>::preOrder()
{
preOrder(mRoot);
}

/*
* 中序遍历"AVL树"
*/
template <class T>
void AVLTree<T>::inOrder(AVLTreeNode<T>* tree) const
{
if(tree != NULL)
{
inOrder(tree->left);
cout<< tree->key << " " ;
inOrder(tree->right);
}
}

template <class T>
void AVLTree<T>::inOrder()
{
inOrder(mRoot);
}

/*
* 后序遍历"AVL树"
*/
template <class T>
void AVLTree<T>::postOrder(AVLTreeNode<T>* tree) const
{
if(tree != NULL)
{
postOrder(tree->left);
postOrder(tree->right);
cout<< tree->key << " " ;
}
}

template <class T>
void AVLTree<T>::postOrder()
{
postOrder(mRoot);
}

/*
* (递归实现)查找"AVL树x"中键值为key的节点
*/
template <class T>
AVLTreeNode<T>* AVLTree<T>::search(AVLTreeNode<T>* x, T key) const
{
if (x==NULL || x->key==key)
return x;

if (key < x->key)
return search(x->left, key);
else
return search(x->right, key);
}

template <class T>
AVLTreeNode<T>* AVLTree<T>::search(T key)
{
return search(mRoot, key);
}

/*
* (非递归实现)查找"AVL树x"中键值为key的节点
*/
template <class T>
AVLTreeNode<T>* AVLTree<T>::iterativeSearch(AVLTreeNode<T>* x, T key) const
{
while ((x!=NULL) && (x->key!=key))
{
if (key < x->key)
x = x->left;
else
x = x->right;
}

return x;
}

template <class T>
AVLTreeNode<T>* AVLTree<T>::iterativeSearch(T key)
{
return iterativeSearch(mRoot, key);
}

/*
* 查找最小结点:返回tree为根结点的AVL树的最小结点。
*/
template <class T>
AVLTreeNode<T>* AVLTree<T>::minimum(AVLTreeNode<T>* tree)
{
if (tree == NULL)
return NULL;

while(tree->left != NULL)
tree = tree->left;
return tree;
}

template <class T>
T AVLTree<T>::minimum()
{
AVLTreeNode<T> *p = minimum(mRoot);
if (p != NULL)
return p->key;

return (T)NULL;
}

/*
* 查找最大结点:返回tree为根结点的AVL树的最大结点。
*/
template <class T>
AVLTreeNode<T>* AVLTree<T>::maximum(AVLTreeNode<T>* tree)
{
if (tree == NULL)
return NULL;

while(tree->right != NULL)
tree = tree->right;
return tree;
}

template <class T>
T AVLTree<T>::maximum()
{
AVLTreeNode<T> *p = maximum(mRoot);
if (p != NULL)
return p->key;

return (T)NULL;
}

/*
* LL:左左对应的情况(左单旋转)。
*
* 返回值:旋转后的根节点
*/
template <class T>
AVLTreeNode<T>* AVLTree<T>::leftLeftRotation(AVLTreeNode<T>* k2)
{
AVLTreeNode<T>* k1=k2->left;
k2->left=k1->right;
k1->right=k2;
k2->height=max(height(k2->left),height(k2->right))+1;
k1->height=max(height(k1->left),height(k1->right))+1;
return k1;
}

/*
* RR:右右对应的情况(右单旋转)。
*
* 返回值:旋转后的根节点
*/
template <class T>
AVLTreeNode<T>* AVLTree<T>::rightRightRotation(AVLTreeNode<T>* k1)
{
AVLTreeNode<T>* k2=k1->right;
k1->right=k2->left;
k2->left=k1;

k1->height=max(height(k1->left),height(k1->right))+1;
k2->height=max(height(k2->left),height(k2->right))+1;
return k2;
}

/*
* LR:左右对应的情况(左双旋转)。
*
* 返回值:旋转后的根节点
*/
template <class T>
AVLTreeNode<T>* AVLTree<T>::leftRightRotation(AVLTreeNode<T>* k3)
{
k3->left=rightRightRotation(k3->left);
return leftLeftRotation(k3);
}

/*
* RL:右左对应的情况(右双旋转)。
*
* 返回值:旋转后的根节点
*/
template <class T>
AVLTreeNode<T>* AVLTree<T>::rightLeftRotation(AVLTreeNode<T>* k1)
{
k1->right = leftLeftRotation(k1->right);

return rightRightRotation(k1);
}

/*
* 将结点插入到AVL树中,并返回根节点
*
* 参数说明:
* tree AVL树的根结点
* key 插入的结点的键值
* 返回值:
* 根节点
*/
template <class T>
AVLTreeNode<T>* AVLTree<T>::insert(AVLTreeNode<T>* &tree, T key)
{
if (tree == NULL)
{
// 新建节点
tree = new AVLTreeNode<T>(key, NULL, NULL);
if (tree==NULL)
{
cout << "ERROR: create avltree node failed!" << endl;
return NULL;
}
}
else if (key < tree->key) // 应该将key插入到"tree的左子树"的情况
{
tree->left = insert(tree->left, key);
// 插入节点后,若AVL树失去平衡,则进行相应的调节。
if (height(tree->left) - height(tree->right) == 2)
{
if (key < tree->left->key)
tree = leftLeftRotation(tree);
else
tree = leftRightRotation(tree);
}
}
else if (key > tree->key) // 应该将key插入到"tree的右子树"的情况
{
tree->right = insert(tree->right, key);
// 插入节点后,若AVL树失去平衡,则进行相应的调节。
if (height(tree->right) - height(tree->left) == 2)
{
if (key > tree->right->key)
tree = rightRightRotation(tree);
else
tree = rightLeftRotation(tree);
}
}
else //key == tree->key)
{
cout << "添加失败:不允许添加相同的节点!" << endl;
}

tree->height = max( height(tree->left), height(tree->right)) + 1;

return tree;
}

template <class T>
void AVLTree<T>::insert(T key)
{
insert(mRoot, key);
}

/*
* 删除结点(z),返回根节点
*
* 参数说明:
* tree AVL树的根结点
* z 待删除的结点
* 返回值:
* 根节点
*/
template <class T>
AVLTreeNode<T>* AVLTree<T>::remove(AVLTreeNode<T>* &tree, AVLTreeNode<T>* z)
{
// 根为空 或者 没有要删除的节点,直接返回NULL。
if (tree==NULL || z==NULL)
return NULL;

if (z->key < tree->key) // 待删除的节点在"tree的左子树"中
{
tree->left = remove(tree->left, z);
// 删除节点后,若AVL树失去平衡,则进行相应的调节。
if (height(tree->right) - height(tree->left) == 2)
{
AVLTreeNode<T> *r = tree->right;
if (height(r->left) > height(r->right))
tree = rightLeftRotation(tree);
else
tree = rightRightRotation(tree);
}
}
else if (z->key > tree->key)// 待删除的节点在"tree的右子树"中
{
tree->right = remove(tree->right, z);
// 删除节点后,若AVL树失去平衡,则进行相应的调节。
if (height(tree->left) - height(tree->right) == 2)
{
AVLTreeNode<T> *l = tree->left;
if (height(l->right) > height(l->left))
tree = leftRightRotation(tree);
else
tree = leftLeftRotation(tree);
}
}
else // tree是对应要删除的节点。
{
// tree的左右孩子都非空
if ((tree->left!=NULL) && (tree->right!=NULL))
{
if (height(tree->left) > height(tree->right))
{
// 如果tree的左子树比右子树高;
// 则(01)找出tree的左子树中的最大节点
// (02)将该最大节点的值赋值给tree。
// (03)删除该最大节点。
// 这类似于用"tree的左子树中最大节点"做"tree"的替身;
// 采用这种方式的好处是:删除"tree的左子树中最大节点"之后,AVL树仍然是平衡的。
AVLTreeNode<T>* max = maximum(tree->left);
tree->key = max->key;
tree->left = remove(tree->left, max);
}
else
{
// 如果tree的左子树不比右子树高(即它们相等,或右子树比左子树高1)
// 则(01)找出tree的右子树中的最小节点
// (02)将该最小节点的值赋值给tree。
// (03)删除该最小节点。
// 这类似于用"tree的右子树中最小节点"做"tree"的替身;
// 采用这种方式的好处是:删除"tree的右子树中最小节点"之后,AVL树仍然是平衡的。
AVLTreeNode<T>* min = maximum(tree->right);
tree->key = min->key;
tree->right = remove(tree->right, min);
}
}
else
{
AVLTreeNode<T>* tmp = tree;
tree = (tree->left!=NULL) ? tree->left : tree->right;
delete tmp;
}
}

return tree;
}

template <class T>
void AVLTree<T>::remove(T key)
{
AVLTreeNode<T>* z;

if ((z = search(mRoot, key)) != NULL)
mRoot = remove(mRoot, z);
}

/*
* 销毁AVL树
*/
template <class T>
void AVLTree<T>::destroy(AVLTreeNode<T>* &tree)
{
if (tree==NULL)
return ;

if (tree->left != NULL)
destroy(tree->left);
if (tree->right != NULL)
destroy(tree->right);

delete tree;
}

template <class T>
void AVLTree<T>::destroy()
{
destroy(mRoot);
}

/*
* 打印"二叉查找树"
*
*key -- 节点的键值
*direction -- 0,表示该节点是根节点;
* -1,表示该节点是它的父结点的左孩子;
* 1,表示该节点是它的父结点的右孩子。
*/
template <class T>
void AVLTree<T>::print(AVLTreeNode<T>* tree, T key, int direction)
{
if(tree != NULL)
{
if(direction==0) // tree是根节点
cout << setw(2) << tree->key << " is root" <<", height is "<<tree->height<< endl;
else // tree是分支节点
cout << setw(2) << tree->key << " is " << setw(2) << key << "'s " << setw(12) << (direction==1?"right child" : "left child") <<", height is "<<tree->height<< endl;

print(tree->left, tree->key, -1);
print(tree->right,tree->key, 1);
}
}

template <class T>
void AVLTree<T>::print()
{
if (mRoot != NULL)
print(mRoot, mRoot->key, 0);
}

测试文件 test.cpp

1
2
3
4
5
6
7
8
9
10
11
12
13
14
15
16
17
18
19
20
21
22
23
24
25
26
27
28
29
30
31
32
33
34
35
36
37
38
39
40
41
42
43
44
45
46
47
48
49
50
#include <iostream>
#include "AVLTree.cpp"
using namespace std;

static int arr[]= {3,2,1,4,5,6,7,16,15,14,13,12,11,10,8,9};
#define TBL_SIZE(a) ( (sizeof(a)) / (sizeof(a[0])) )

int main()
{
int i,ilen;
AVLTree<int>* tree=new AVLTree<int>();

cout << "== 依次添加: ";
ilen = TBL_SIZE(arr);
for(i=0; i<ilen; i++)
{
cout << arr[i] <<" ";
tree->insert(arr[i]);
}

cout << "\n== 前序遍历: ";
tree->preOrder();

cout << "\n== 中序遍历: ";
tree->inOrder();

cout << "\n== 后序遍历: ";
tree->postOrder();
cout << endl;

cout << "== 高度: " << tree->height() << endl;
cout << "== 最小值: " << tree->minimum() << endl;
cout << "== 最大值: " << tree->maximum() << endl;
cout << "== 树的详细信息: " << endl;
tree->print();

i = 8;
cout << "\n== 删除根节点: " << i;
tree->remove(i);

cout << "\n== 高度: " << tree->height() ;
cout << "\n== 中序遍历: " ;
tree->inOrder();
cout << "\n== 树的详细信息: " << endl;
tree->print();

// 销毁二叉树
tree->destroy();
return 0;
}
123
cloudintheking

cloudintheking

北落师门

24 日志
6 分类
15 标签
RSS
GitHub segmentfault E-Mail   High
Links
  • V2EX
  • 掘金
© 2018 — 2022 cloudintheking | 站点总字数: 102k | 站点阅读时长 ≈ 1:32