cloudintheking

时光醉清风,总有人会记得


  • 首页

  • paint

  • works

  • 标签15

  • 分类6

  • 归档24

npm 升级失败解决方案

发表于 2018-07-14 | 更新于 2021-04-26 | 分类于 问题总结篇 | 评论数:
本文字数: 900 | 阅读时长 ≈ 1 分钟


个人笔记,如有描述不当,欢迎留言指出~

说一下我的开发环境:

  • Windows 10
  • node 8.10.0
  • nvm 1.1.6

npm这个东东其实也不会经常去升级它,但因为要安装angular cli,提示我npm版本低了得升级,这才去升级,哪晓得一个简单npm升级居然就炸了。

error:

1
npm ERR! path C:\Program Files\nodejs\npm.cmd npm ERR! code EEXIST npm ERR! Refusing to delete C:\Program Files\nodejs\npm.cmd: is outside C:\Program Files\nodejs\node_modules\npm and not a link npm ERR! File exists: C:\Program Files\nodejs\npm.cmd npm ERR! Move it away, and try again.

提示我移除C:\Program Files\nodejs\npm.cmd这个文件,可这个文件不是npm的命令文件吗,把这移除了,那我命令行里敲npm xxx什么的不都执行不了吗?算了,先按提示来吗,我移除了npm.cmd,嗯,这下好了,npm -v 都报错了。

百度了半天也没找到类似的错误,最后没办法,只好使出那一招了,大科学上网术!(翻墙谷歌)|100*0

很快就找到类似的错误了,给我激动的哇 issues

至于为啥会报这种错,我琢磨着可能是因为我从npm5.x.x升级到6.x.x,跨了一个大版本的原因吧,后来从npm6.1.0正常升到6.3.0就没报错了

解决方案如下:

  • 首先将你nodejs安装目录下的 node_modules/npm文件夹 复制到任意路径下
  • 再将nodejs安装目录下的npm.bin、npm.cmd删了
  • 最后进入第一步复制的xxx/npm/bin目录下,执行node npm-cli.js i -g npm@latest 命令,欧了!

我是真滴佩服想出这个办法的仁兄,高,太高了
windows下安装nvm及nrm

发表于 2018-07-12 | 更新于 2021-04-26 | 分类于 环境安装篇 | 评论数:
本文字数: 3k | 阅读时长 ≈ 3 分钟


个人笔记,如有描述不当,欢迎留言指出~

nvm

nvm是什么以及应用场景

基于node的项目对node版本依赖是不同的,而电脑上只安装了一个node的版本,那显然是不够的。所以nvm(Node Version Manager),一个node版本管理工具就诞生了。它就就像是一个开关,切换系统里不同的node版本,切记同一时刻有且只有一个node版本生效,node8和node10不能同时存在。

安装

如果你已经装了node了,建议完全卸载了(连同npm,还有环境变量),如果不卸载的话可能会和nvm发生冲突 下载地址

它有两个版本 nvm-noinstall.zip(免安装) 、nvm-setup.zip(图形界面安装GUI),它们两个区别只在于免安装需要自己手动配置环境变量而GUI版给你自动配好了,下面基于GUI版简单说明一下:

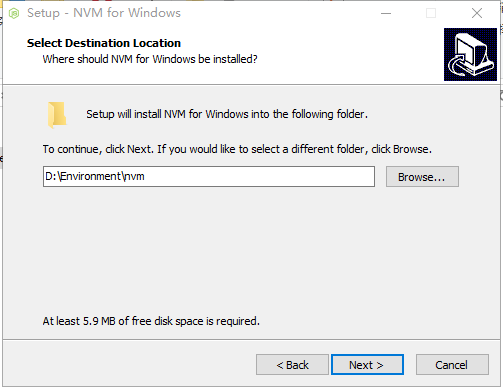
当你安装到这一步时,选择nvm的安装目录,我这里是:D:\Environment\nvm

1533348466236

这一步是设置创建一个链接目录指向真正的node的安装目录,我这里是:D:\Environment\nodejs

1533348746705

一直next直到安装完成,期间的所有环境变量都会自动加入系统路径中(方便!)

配置settings.txt

  • 如果你是免安装,有两种方法

    1. 我们打开免安装目录下的install.cmd文件,内容如下:

      1
      2
      3
      4
      5
      6
      7
      8
      9
      10
      11
      12
      13
      14
      15
      @echo off
      set /P NVM_PATH="Enter the absolute path where the zip file is extracted/copied to: " #输入nvm安装目录路径
      setx /M NVM_HOME "%NVM_PATH%" #将你输入的路径赋给NVM_HOME环境变量
      setx /M NVM_SYMLINK "C:\Program Files\nodejs" #默认路径赋给NVM_SYMLINK变量,可以将默认路径修改成任意路径
      setx /M PATH "%PATH%;%NVM_HOME%;%NVM_SYMLINK%" #将NVM_HOME、NVM_SYMLINK将入PATH中

      if exist "%SYSTEMDRIVE%\Program Files (x86)\" (
      set SYS_ARCH=64
      ) else (
      set SYS_ARCH=32
      )
      (echo root: %NVM_HOME% && echo path: %NVM_SYMLINK% && echo arch: %SYS_ARCH% && echo proxy: none) > %NVM_HOME%\settings.txt #在nvm目录下生成settings.txt

      notepad %NVM_HOME%\settings.txt
      @echo on

      简单点说,install.cmd的作用就是帮你自动配置环境变量并生成settings.txt。

    2. 当然你也可以不用install.cmd,自己手动创建settings.txt,手动配置环境变量,毕竟自己动手,丰衣足食img

  • 如果你是GUI安装,直接打开nvm安装目录下的settings.txt ,修改如下:

1
2
3
4
5
6
root: D:\Environment\nvm  //改成你的nvm安装目录
path: D:\Environment\nodejs //改成你的nvm安装目录
arch: 64 //你的系统指令架构64位,默认的不必修改
proxy: none //代理配置,无
node_mirror: http://npm.taobao.org/mirrors/node/ //node镜像源
npm_mirror: https://npm.taobao.org/mirrors/npm/ //npm镜像源

配置环境变量

  • 如果你是通过GUI安装的,那么你的环境变量已经自动配好了,你可以跳过这一步,也可以跟着看下去,看看自动配置是否有误

  • 如果你是免安装又不想用install.cmd的话,建议在个人环境变量中加入下面的参数,因为这样不会扰乱系到统环境变量 ,快捷打开环境变量界面:windows+r => sysdm.cpl

    1
    2
    NVM_HOME: D:\Environment\nvm  //改成你的nvm安装目录
    NVM_SYMLINK : D:\Environment\nodejs //改成你的nodejs链接目录

    最后别忘了,在PATH里加上 ;%NVM_HOME%;%NVM_SYMLINK%;

使用

打开控制台,输入:nvm version,若是出现版本信息,则安装成功。若报错,那就面壁思过,我讲的辣么详细。

这里介绍一些常用命令,剩下自己探索吧

1
2
3
4
nvm install <version> [arch] :version是版本号、arch是系统位数,默认64位,比如:nvm install 8.10.0  安装64位的nodejs8.10.0
nvm uninstall <version> :删除对应node版本
nvm list :会显示你系统中安装的所有node版本,并标明当前应用的那个node版本
nvm use [version] [arch] :选择生效哪个node版本

nrm

nrm是什么及应用场景

nrm(npm registry manager ),npm 镜像源管理工具。有时候访问国外资源太慢了,我们就得更换npm的源,命令是npm config set registry xxxxxxxx,考虑到有的公司还有私有源,如果每次更改源都要敲那么长的命令,那效率太低了。but nrm替我们管理了这些源,我们只需要简单的切换一下!

安装及使用

1
2
3
4
5
6
7
8
9
10
11
12
13
14
15
npm install -g nrm      直接使用npm全局安装即可
nrm --help
Usage: nrm [options] [command]
Commands:
ls 列出所有的源
current 显示当前源的名称
use <registry> 切换源
add <registry> <url> [home] 添加源
del|rm <registry> 删除原
home <registry> [browser] 打开源的官方主页
test [registry] 测试下这些源的响应时间
help print this help
Options:
-h, --help output usage information
-V, --version output the version number

springboot多数据源配置

发表于 2018-07-06 | 更新于 2021-04-26 | 分类于 后端笔记 | 评论数:
本文字数: 10k | 阅读时长 ≈ 9 分钟


个人笔记,如有描述不当,欢迎留言指出~

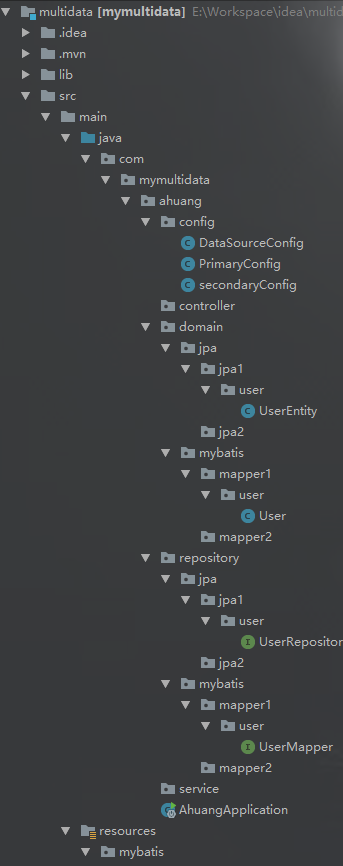
项目结构图

@图1
@图2

相关配置

pom.xml

1
2
3
4
5
6
7
8
9
10
11
12
13
14
15
16
17
18
19
20
21
22
23
24
25
26
27
28
29
30
31
32
33
34
35
36
37
38
39
40
41
42
43
44
45
46
47
48
49
50
51
52
53
54
55
<?xml version="1.0" encoding="utf-8"?>
<project xmlns="http://maven.apache.org/POM/4.0.0" xmlns:xsi="http://www.w3.org/2001/XMLSchema-instance" xsi:schemaLocation="http://maven.apache.org/POM/4.0.0http://maven.apache.org/xsd/maven-4.0.0.xsd">
<modelVersion>4.0.0</modelVersion>
<groupId>com.mymultidata</groupId>
<artifactId>ahuang</artifactId>
<version>0.0.1-SNAPSHOT</version>
<packaging>jar</packaging>
<name>ahuang</name>
<description>Demo project for Spring Boot</description>
<parent>
<groupId>org.springframework.boot</groupId>
<artifactId>spring-boot-starter-parent</artifactId>
<version>1.5.12.RELEASE</version>
<relativePath/>
<!-- lookup parent from repository -->
</parent>
<properties>
<project.build.sourceEncoding>UTF-8</project.build.sourceEncoding>
<project.reporting.outputEncoding>UTF-8</project.reporting.outputEncoding>
<java.version>1.8</java.version>
</properties>
<dependencies>
<dependency>
<groupId>org.springframework.boot</groupId>
<artifactId>spring-boot-starter-data-jpa</artifactId>
</dependency>
<dependency>
<groupId>org.springframework.boot</groupId>
<artifactId>spring-boot-starter-web</artifactId>
</dependency>
<dependency>
<groupId>mysql</groupId>
<artifactId>mysql-connector-java</artifactId>
<scope>runtime</scope>
</dependency>
<dependency>
<groupId>org.mybatis.spring.boot</groupId>
<artifactId>mybatis-spring-boot-starter</artifactId>
<version>1.3.1</version>
</dependency>
<dependency>
<groupId>org.springframework.boot</groupId>
<artifactId>spring-boot-starter-test</artifactId>
<scope>test</scope>
</dependency>
</dependencies>
<build>
<plugins>
<plugin>
<groupId>org.springframework.boot</groupId>
<artifactId>spring-boot-maven-plugin</artifactId>
</plugin>
</plugins>
</build>
</project>

application.properties

1
2
3
4
5
6
7
8
9
10
11
12
13
14
15
16
17
18
19
20
21
22
23
24
25
#主数据源
spring.datasource.primary.url=jdbc:mysql://localhost:3306/test1?useUnicode=true&characterEncoding=utf-8&serverTimezone=UTC&useSSL=true
spring.datasource.primary.username=root
spring.datasource.primary.password=xxxxxx
spring.datasource.primary.driver-class-name=com.mysql.jdbc.Driver
spring.datasource.max-active=10
spring.datasource.primary.max-idle=5
spring.datasource.primary.min-idle=0
#次数据源
spring.datasource.secondary.url=jdbc:mysql://localhost:3306/test2?useUnicode=true&characterEncoding=utf-8&serverTimezone=UTC&useSSL=true
spring.datasource.secondary.username=root
spring.datasource.secondary.password=xxxxxx
spring.datasource.secondary.driver-class-name=com.mysql.jdbc.Driver
spring.datasource.secondary.max-active=10
spring.datasource.secondary.max-idle=5
spring.datasource.secondary.min-idle=0
#tomcat
server.port=8082
#hibernate配置
spring.jpa.properties.hibernate.hbm2ddl.auto=update
spring.jpa.properties.hibernate.dialect=org.hibernate.dialect.MySQL5InnoDBDialect
spring.jpa.show-sql= true
#mybatis配置
mybatis.config-locations=classpath:mybatis/config.xml
mybatis.mapper-locations=classpath:mybatis/mapper/*/*/*.xml

spring.datasource.primary.xxx、spring.datasource.secondary.xxx并非springboot的默认参数,这些配置并不能生效,所以要自己定义下数据源配置类。
还记得config目录下DataSourceConfig.java这个类吗?这个类就是用来配置多个数据源的。

数据源配置

DataSourceConfig.java

1
2
3
4
5
6
7
8
9
10
11
12
13
14
15
16
17
18
19
20
21
22
23
24
25
26
27
28
29
30
package com.mymultidata.ahuang.config;
import org.springframework.beans.factory.annotation.Qualifier;
import org.springframework.boot.autoconfigure.jdbc.DataSourceBuilder;
import org.springframework.boot.context.properties.ConfigurationProperties;
import org.springframework.context.annotation.Bean;
import org.springframework.context.annotation.Configuration;
import javax.sql.DataSource;
/**
* @Author: hl
* @Description: TODO
* @Date: 13:55 2018/4/24
* @Modified By:
* @Version 1.0
*/
@Configuration
public class DataSourceConfig {
@Bean("primaryDataSource")
@Qualifier("primaryDataSource")
@ConfigurationProperties(prefix = "spring.datasource.primary")
public DataSource primaryDataSource(){
return DataSourceBuilder.create().build();
}

@Bean("secondaryDataSource")
@Qualifier("secondaryDataSource")
@ConfigurationProperties(prefix = "spring.datasource.secondary")
public DataSource secondaryDataSource(){
return DataSourceBuilder.create().build();
}
}

@ConfigurationProperties(prefix = "spring.datasource.primary"):找到application.properties里前缀为spring.datasource.primary的参数并自动注入值到DataSource中。我这里是准备将primary数据源集成jpa,secondary数据源集成mybaitis,这里只配了两个数据源,同学们可以举一反三,third,fourth…

数据源事务配置

基于jpa

PrimaryConfig.java

1
2
3
4
5
6
7
8
9
10
11
12
13
14
15
16
17
18
19
20
21
22
23
24
25
26
27
28
29
30
31
32
33
34
35
36
37
38
39
40
41
42
43
44
45
46
47
48
49
50
51
52
53
54
55
56
57
58
59
60
61
62
63
64
65
66
67
 package com.mymultidata.ahuang.config;
import org.springframework.beans.factory.annotation.Autowired;
import org.springframework.beans.factory.annotation.Qualifier;
import org.springframework.boot.autoconfigure.orm.jpa.JpaProperties;
import org.springframework.boot.orm.jpa.EntityManagerFactoryBuilder;
import org.springframework.context.annotation.Bean;
import org.springframework.context.annotation.Configuration;
import org.springframework.context.annotation.Primary;
import org.springframework.data.jpa.repository.config.EnableJpaRepositories;
import org.springframework.orm.jpa.JpaTransactionManager;
import org.springframework.orm.jpa.LocalContainerEntityManagerFactoryBean;
import org.springframework.transaction.PlatformTransactionManager;
import org.springframework.transaction.annotation.EnableTransactionManagement;
import javax.persistence.EntityManager;
import javax.sql.DataSource;
import java.util.Map;
/**
* @Author: hl
* @Description: TODO
* @Date: 14:23 2018/4/24
* @Modified By:
* @Version 1.0
*/
@Configuration
@EnableTransactionManagement
//entityManagerFactoryRef:引用实体管理工厂
// transactionManagerRef:引用事务管理工厂
// basePackages:设置jpa的repository接口类的包路径,可配置多个
@EnableJpaRepositories(
entityManagerFactoryRef = "entityManagerFactoryPrimary",
transactionManagerRef = "transactionManagerPrimary",
basePackages = {"com.mymultidata.ahuang.repository.jpa.jpa1"})
public class PrimaryConfig {
@Autowired
@Qualifier("primaryDataSource")
private DataSource primaryDataSource;//注入primary数据源

@Autowired(required = false)
private JpaProperties jpaProperties;//注入jpa全局参数

@Primary
@Bean(name = "entityManagerPrimary")
public EntityManager entityManager(EntityManagerFactoryBuilder builder){
return entityManagerFactoryPrimary(builder).getObject().createEntityManager();
}

@Primary
@Bean(name = "entityManagerFactoryPrimary")
public LocalContainerEntityManagerFactoryBean entityManagerFactoryPrimary (EntityManagerFactoryBuilder builder) {
return builder
.dataSource(primaryDataSource)
.properties(getVendorProperties(primaryDataSource))
.packages("com.mymultidata.ahuang.domain.jpa.jpa1") //设置实体类所在位置
.persistenceUnit("primaryPersistenceUnit")
.build();
}

private Map<String, String> getVendorProperties(DataSource dataSource) {
return jpaProperties.getHibernateProperties(dataSource);
}

@Primary
@Bean(name = "transactionManagerPrimary")
public PlatformTransactionManager transactionManagerPrimary(EntityManagerFactoryBuilder builder) {
return new JpaTransactionManager(entityManagerFactoryPrimary(builder).getObject());
}
}

基于mybatis

SecondaryConfig.java:

1
2
3
4
5
6
7
8
9
10
11
12
13
14
15
16
17
18
19
20
21
22
23
24
25
26
27
28
29
30
31
32
33
34
35
36
37
38
39
40
41
42
43
44
package com.mymultidata.ahuang.config;
import org.apache.ibatis.session.SqlSessionFactory;
import org.mybatis.spring.SqlSessionFactoryBean;
import org.mybatis.spring.SqlSessionTemplate;
import org.mybatis.spring.annotation.MapperScan;
import org.springframework.beans.factory.annotation.Autowired;
import org.springframework.beans.factory.annotation.Qualifier;
import org.springframework.context.annotation.Bean;
import org.springframework.context.annotation.Configuration;
import org.springframework.core.io.support.PathMatchingResourcePatternResolver;
import org.springframework.jdbc.datasource.DataSourceTransactionManager;
import javax.sql.DataSource;
/**
* @Author: hl
* @Description: TODO
* @Date: 15:05 2018/4/24
* @Modified By:
* @Version 1.0
*/
@Configuration
//basePackages:设置mapperj接口类所在位置
@MapperScan(basePackages = {"com.mymultidata.ahuang.repository.mybatis.mapper1"},sqlSessionTemplateRef ="secondarySqlSessionTemplate" )
public class secondaryConfig {
@Autowired
@Qualifier("secondaryDataSource")
private DataSource dataSource;

@Bean(name = "secondarySqlSessionFactory")
public SqlSessionFactory testSqlSessionFactory() throws Exception {
SqlSessionFactoryBean bean = new SqlSessionFactoryBean();
bean.setDataSource(dataSource);
bean.setMapperLocations(new PathMatchingResourcePatternResolver().getResources("classpath:mybatis/mapper/mapper1/*/*.xml"));//设置mapper.xml路径,路径中之所以加了'*'号,是为了项目的功能划分,方便分析,如果你的映射文件不做功能划分的话,可以改为"classpath:mybatis/mapper/mapper1/*.xml"
return bean.getObject();
}
@Bean(name = "secondaryTransactionManager")
public DataSourceTransactionManager testTransactionManager(@Qualifier("secondaryDataSource") DataSource dataSource) {
return new DataSourceTransactionManager(dataSource);
}

@Bean(name = "secondarySqlSessionTemplate")
public SqlSessionTemplate testSqlSessionTemplate(@Qualifier("secondarySqlSessionFactory") SqlSessionFactory sqlSessionFactory) throws Exception {
return new SqlSessionTemplate(sqlSessionFactory);
}
}

到这里配置已经好了,剩下的就是结合业务去实现了。

Hello World

发表于 2018-07-04 | 更新于 2021-04-26 | 评论数:
本文字数: 438 | 阅读时长 ≈ 1 分钟


Welcome to Hexo! This is your very first post. Check documentation for more info. If you get any problems when using Hexo, you can find the answer in troubleshooting or you can ask me on GitHub.

Quick Start

Create a new post

1
$ hexo new "My New Post"

More info: Writing

Run server

1
$ hexo server

More info: Server

Generate static files

1
$ hexo generate

More info: Generating

Deploy to remote sites

1
$ hexo deploy

More info: Deployment

123
cloudintheking

cloudintheking

北落师门

24 日志
6 分类
15 标签
RSS
GitHub segmentfault E-Mail   High
Links
  • V2EX
  • 掘金
© 2018 — 2022 cloudintheking | 站点总字数: 102k | 站点阅读时长 ≈ 1:32