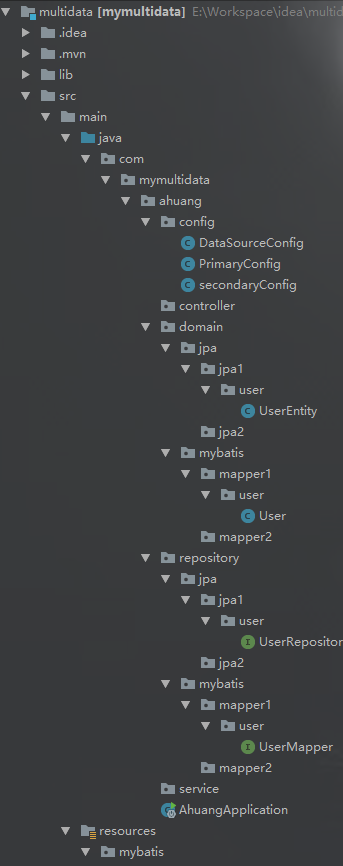
个人笔记,如有描述不当,欢迎留言指出~
项目结构图


相关配置
pom.xml
1 | <?xml version="1.0" encoding="utf-8"?> |
application.properties
1 | #主数据源 |
spring.datasource.primary.xxx、spring.datasource.secondary.xxx并非springboot的默认参数,这些配置并不能生效,所以要自己定义下数据源配置类。
还记得config目录下DataSourceConfig.java这个类吗?这个类就是用来配置多个数据源的。
数据源配置
DataSourceConfig.java1
2
3
4
5
6
7
8
9
10
11
12
13
14
15
16
17
18
19
20
21
22
23
24
25
26
27
28
29
30package com.mymultidata.ahuang.config;
import org.springframework.beans.factory.annotation.Qualifier;
import org.springframework.boot.autoconfigure.jdbc.DataSourceBuilder;
import org.springframework.boot.context.properties.ConfigurationProperties;
import org.springframework.context.annotation.Bean;
import org.springframework.context.annotation.Configuration;
import javax.sql.DataSource;
/**
* @Author: hl
* @Description: TODO
* @Date: 13:55 2018/4/24
* @Modified By:
* @Version 1.0
*/
public class DataSourceConfig {
("primaryDataSource")
("primaryDataSource")
(prefix = "spring.datasource.primary")
public DataSource primaryDataSource(){
return DataSourceBuilder.create().build();
}
("secondaryDataSource")
("secondaryDataSource")
(prefix = "spring.datasource.secondary")
public DataSource secondaryDataSource(){
return DataSourceBuilder.create().build();
}
}
@ConfigurationProperties(prefix = "spring.datasource.primary"):找到application.properties里前缀为spring.datasource.primary的参数并自动注入值到DataSource中。我这里是准备将primary数据源集成jpa,secondary数据源集成mybaitis,这里只配了两个数据源,同学们可以举一反三,third,fourth…
数据源事务配置
基于jpa
PrimaryConfig.java1
2
3
4
5
6
7
8
9
10
11
12
13
14
15
16
17
18
19
20
21
22
23
24
25
26
27
28
29
30
31
32
33
34
35
36
37
38
39
40
41
42
43
44
45
46
47
48
49
50
51
52
53
54
55
56
57
58
59
60
61
62
63
64
65
66
67 package com.mymultidata.ahuang.config;
import org.springframework.beans.factory.annotation.Autowired;
import org.springframework.beans.factory.annotation.Qualifier;
import org.springframework.boot.autoconfigure.orm.jpa.JpaProperties;
import org.springframework.boot.orm.jpa.EntityManagerFactoryBuilder;
import org.springframework.context.annotation.Bean;
import org.springframework.context.annotation.Configuration;
import org.springframework.context.annotation.Primary;
import org.springframework.data.jpa.repository.config.EnableJpaRepositories;
import org.springframework.orm.jpa.JpaTransactionManager;
import org.springframework.orm.jpa.LocalContainerEntityManagerFactoryBean;
import org.springframework.transaction.PlatformTransactionManager;
import org.springframework.transaction.annotation.EnableTransactionManagement;
import javax.persistence.EntityManager;
import javax.sql.DataSource;
import java.util.Map;
/**
* @Author: hl
* @Description: TODO
* @Date: 14:23 2018/4/24
* @Modified By:
* @Version 1.0
*/
//entityManagerFactoryRef:引用实体管理工厂
// transactionManagerRef:引用事务管理工厂
// basePackages:设置jpa的repository接口类的包路径,可配置多个
(
entityManagerFactoryRef = "entityManagerFactoryPrimary",
transactionManagerRef = "transactionManagerPrimary",
basePackages = {"com.mymultidata.ahuang.repository.jpa.jpa1"})
public class PrimaryConfig {
("primaryDataSource")
private DataSource primaryDataSource;//注入primary数据源
(required = false)
private JpaProperties jpaProperties;//注入jpa全局参数
(name = "entityManagerPrimary")
public EntityManager entityManager(EntityManagerFactoryBuilder builder){
return entityManagerFactoryPrimary(builder).getObject().createEntityManager();
}
(name = "entityManagerFactoryPrimary")
public LocalContainerEntityManagerFactoryBean entityManagerFactoryPrimary (EntityManagerFactoryBuilder builder) {
return builder
.dataSource(primaryDataSource)
.properties(getVendorProperties(primaryDataSource))
.packages("com.mymultidata.ahuang.domain.jpa.jpa1") //设置实体类所在位置
.persistenceUnit("primaryPersistenceUnit")
.build();
}
private Map<String, String> getVendorProperties(DataSource dataSource) {
return jpaProperties.getHibernateProperties(dataSource);
}
(name = "transactionManagerPrimary")
public PlatformTransactionManager transactionManagerPrimary(EntityManagerFactoryBuilder builder) {
return new JpaTransactionManager(entityManagerFactoryPrimary(builder).getObject());
}
}
基于mybatis
SecondaryConfig.java:1
2
3
4
5
6
7
8
9
10
11
12
13
14
15
16
17
18
19
20
21
22
23
24
25
26
27
28
29
30
31
32
33
34
35
36
37
38
39
40
41
42
43
44package com.mymultidata.ahuang.config;
import org.apache.ibatis.session.SqlSessionFactory;
import org.mybatis.spring.SqlSessionFactoryBean;
import org.mybatis.spring.SqlSessionTemplate;
import org.mybatis.spring.annotation.MapperScan;
import org.springframework.beans.factory.annotation.Autowired;
import org.springframework.beans.factory.annotation.Qualifier;
import org.springframework.context.annotation.Bean;
import org.springframework.context.annotation.Configuration;
import org.springframework.core.io.support.PathMatchingResourcePatternResolver;
import org.springframework.jdbc.datasource.DataSourceTransactionManager;
import javax.sql.DataSource;
/**
* @Author: hl
* @Description: TODO
* @Date: 15:05 2018/4/24
* @Modified By:
* @Version 1.0
*/
//basePackages:设置mapperj接口类所在位置
(basePackages = {"com.mymultidata.ahuang.repository.mybatis.mapper1"},sqlSessionTemplateRef ="secondarySqlSessionTemplate" )
public class secondaryConfig {
("secondaryDataSource")
private DataSource dataSource;
(name = "secondarySqlSessionFactory")
public SqlSessionFactory testSqlSessionFactory() throws Exception {
SqlSessionFactoryBean bean = new SqlSessionFactoryBean();
bean.setDataSource(dataSource);
bean.setMapperLocations(new PathMatchingResourcePatternResolver().getResources("classpath:mybatis/mapper/mapper1/*/*.xml"));//设置mapper.xml路径,路径中之所以加了'*'号,是为了项目的功能划分,方便分析,如果你的映射文件不做功能划分的话,可以改为"classpath:mybatis/mapper/mapper1/*.xml"
return bean.getObject();
}
(name = "secondaryTransactionManager")
public DataSourceTransactionManager testTransactionManager(@Qualifier("secondaryDataSource") DataSource dataSource) {
return new DataSourceTransactionManager(dataSource);
}
(name = "secondarySqlSessionTemplate")
public SqlSessionTemplate testSqlSessionTemplate(@Qualifier("secondarySqlSessionFactory") SqlSessionFactory sqlSessionFactory) throws Exception {
return new SqlSessionTemplate(sqlSessionFactory);
}
}
到这里配置已经好了,剩下的就是结合业务去实现了。

